

Pin and Arrange Apps on the Start Menu
Author’s Note: This lesson is certified accurate for Windows 11 version 23H2 (March 2024).
Lesson 8
Resources
ZIP file of all resources for lesson 8 (alternatively, download individual files below)
Back to Windows 11 Training Page
Objectives
By the end of this lesson you will understand, be able to discuss, and/or perform the following tasks as they relate to pinning and arranging apps on the Start menu in Windows 11:
- Understand the concept, location of, and navigate to the pinned area of the Start menu.
- Explore the apps pinned to the Start menu on your computer, noting their position in the list
- Add and remove pinned buttons to the Start menu
- Arrange buttons in the Start menu using the keyboard or mouse
Explore the Pinned Section of the Start Menu
Should you ever use a tablet or other Windows device without a keyboard, it is handy to have shortcuts for the apps you need and use most often pinned to the top of the Start Menu.
- First, look at the items pinned to the Start Menu on your computer. Open the Start Menu by pressing the WINDOWS key, and then press TAB to move to the pinned app section.
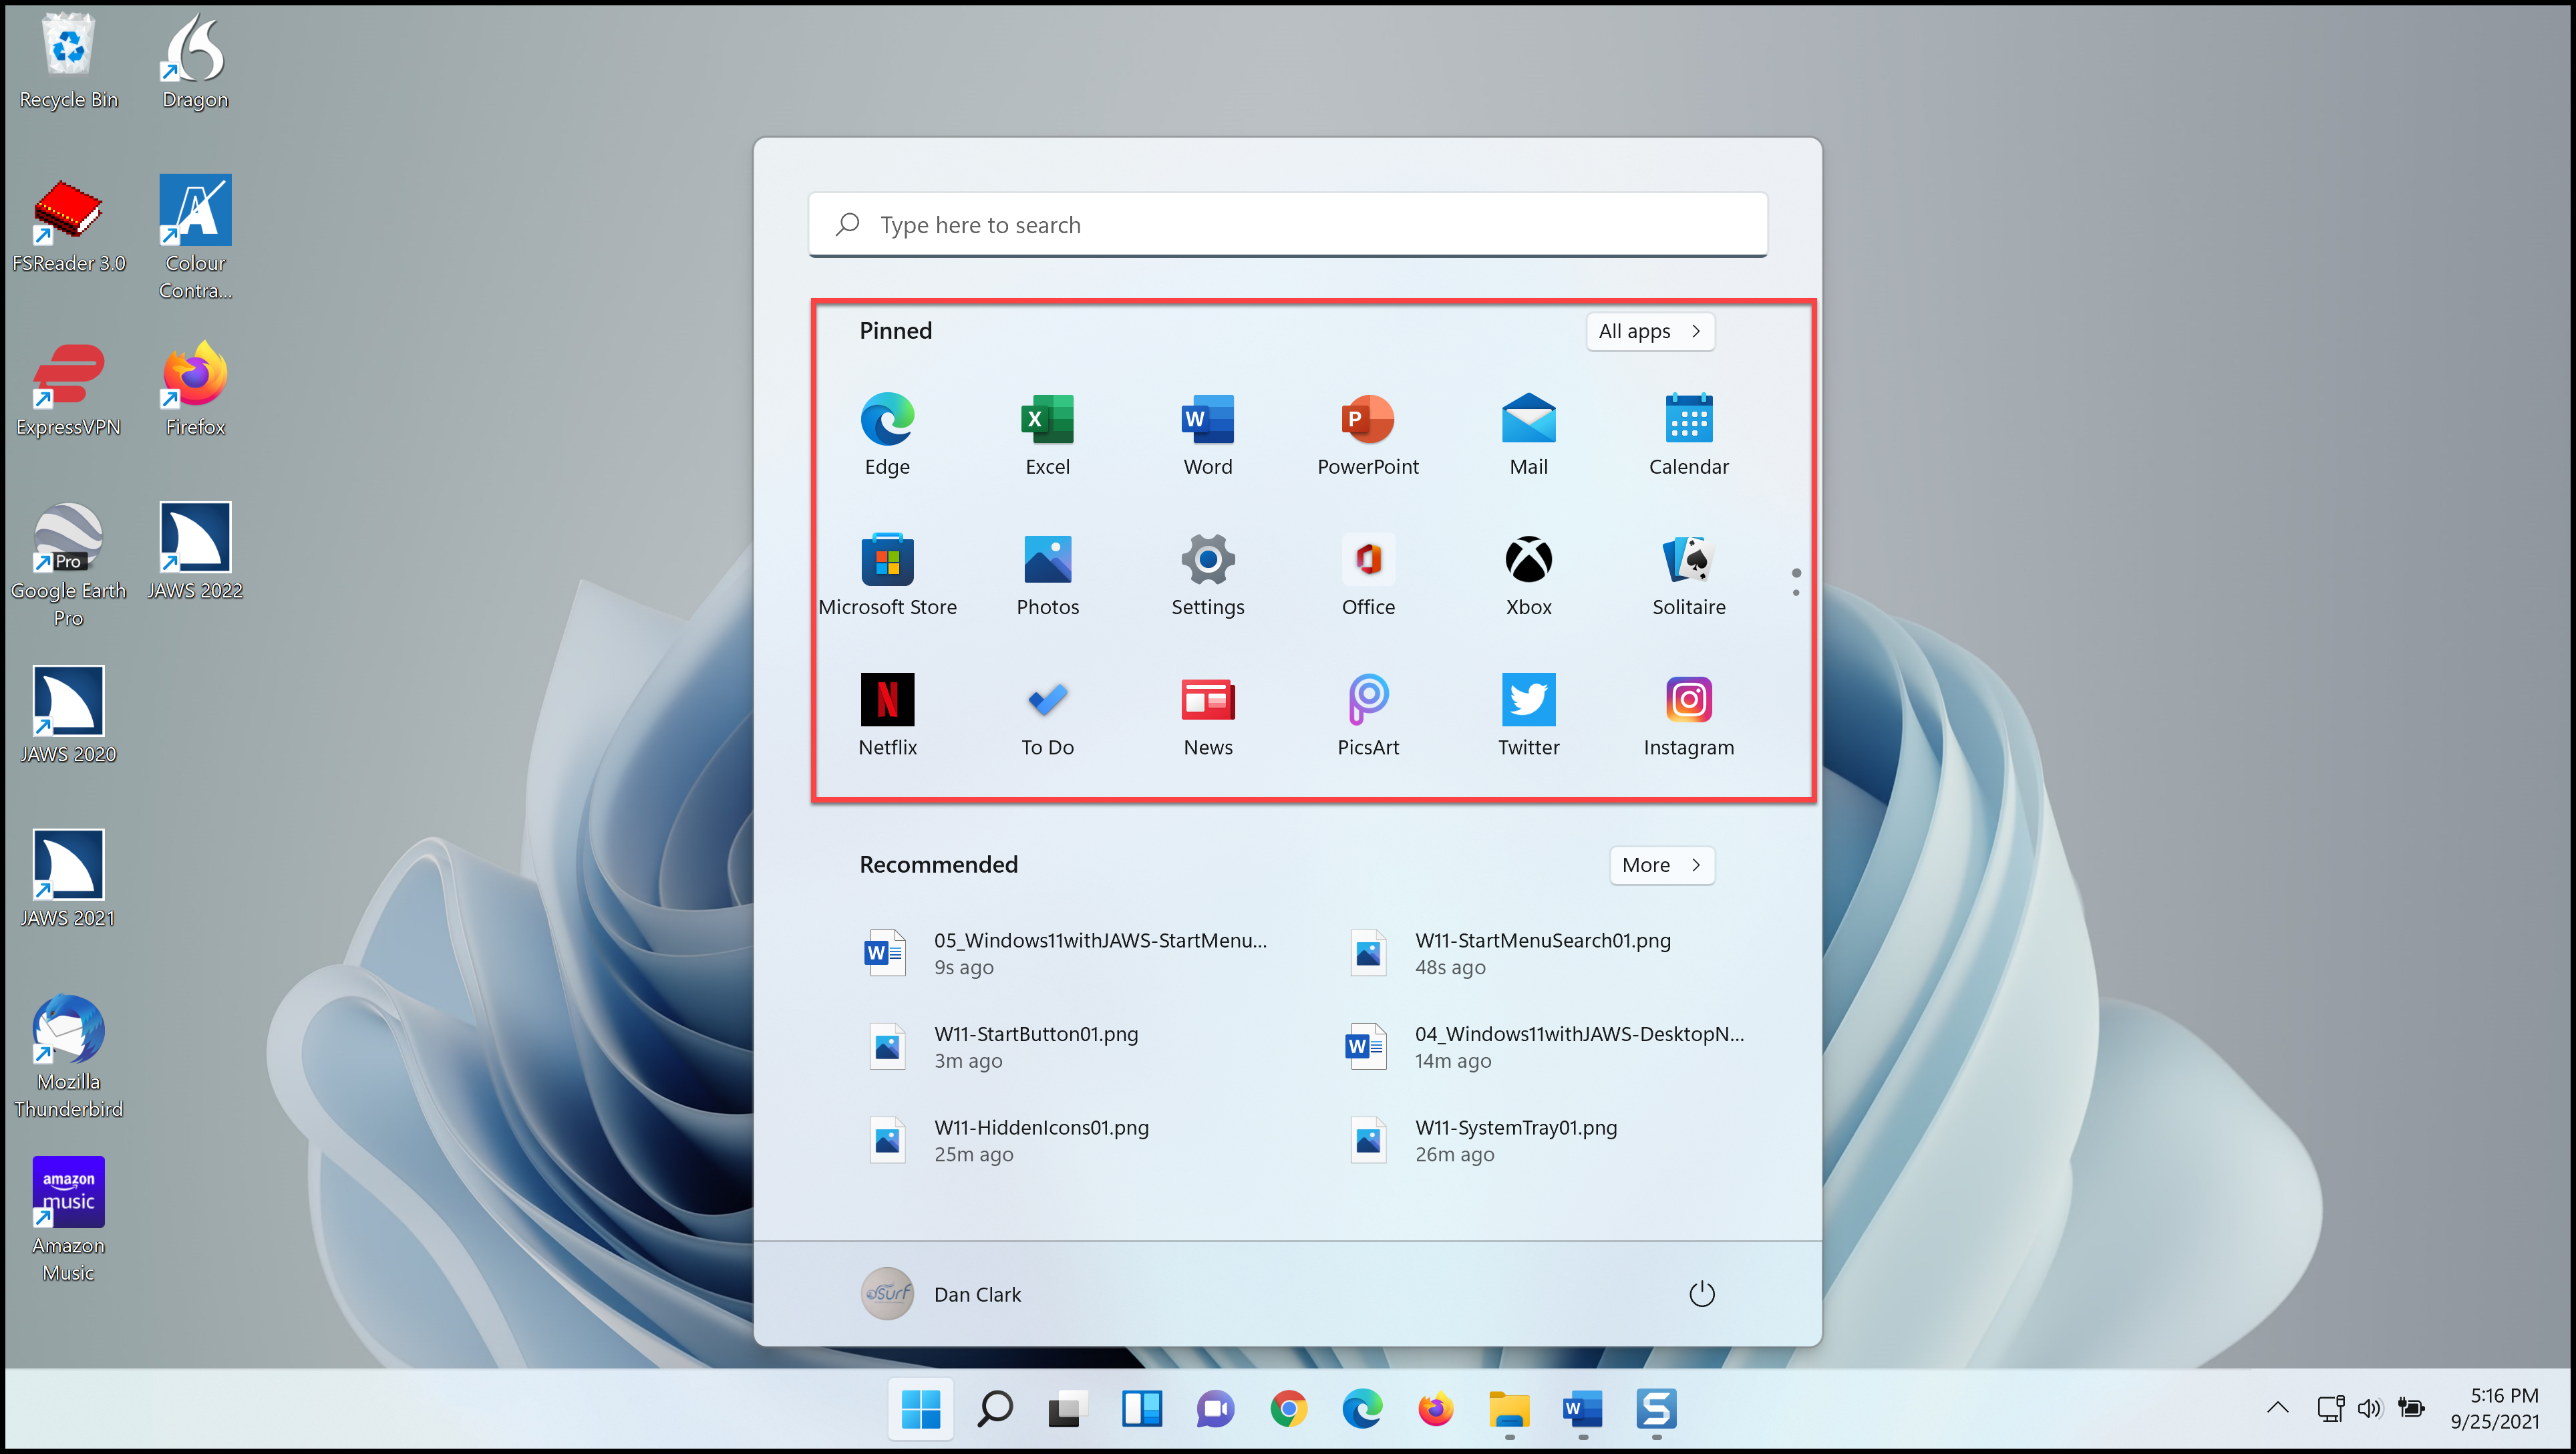
- Next, explore the apps pinned on your computer by pressing RIGHT and LEFT ARROW.
- Press CTRL+END to move to the bottom of the list of pinned apps, and then press LEFT ARROW to explore a few of the items pinned to the bottom of the list.
- For now, press ESC to close the Start menu, but remember the buttons you have currently pinned there and their arrangement. We are about to change that.
Adding or Removing Pinned Items to the Start Menu
You can add apps and folders to the Start menu. Select an icon or folder, and then press the APPLICATION key or right click with a mouse to open a context menu. Then choose Pin to Start.
Remove an App Pinned to the Start Menu
You can remove apps from the Start menu by right-clicking a button or pressing the APPLICATION key to open a context menu, and then choosing Unpin from Start.
- To do this, first open the Start menu by pressing the Windows key.
- Next, move to the first app pinned to the top of the Start menu by pressing the TAB key.
- Third, press the APPLICATION key, SHIFT+F10, or use the right mouse button to open a context menu. There it is, right at the top of the context menu.
- For the time being, press ESC twice to close the menus.
Pin an App from a Windows Desktop Shortcut
For this step let us add the JAWS icon to the Start menu. If JAWS is installed on your computer, you can do this with the JAWS icon on your desktop. If you do not have a JAWS icon on your desktop, you may use any other icon on your desktop for practice.
- First, press WINDOWS key+D to move focus to the Windows desktop.
- Press J to move to the JAWS icon. Press J a few times to find the icon for JAWS 2022, if you have more than one JAWS icon on the desktop of your PC.
- Press the APPLICATION key, SHIFT+F10, or right click the icon with a mouse to open a context menu.
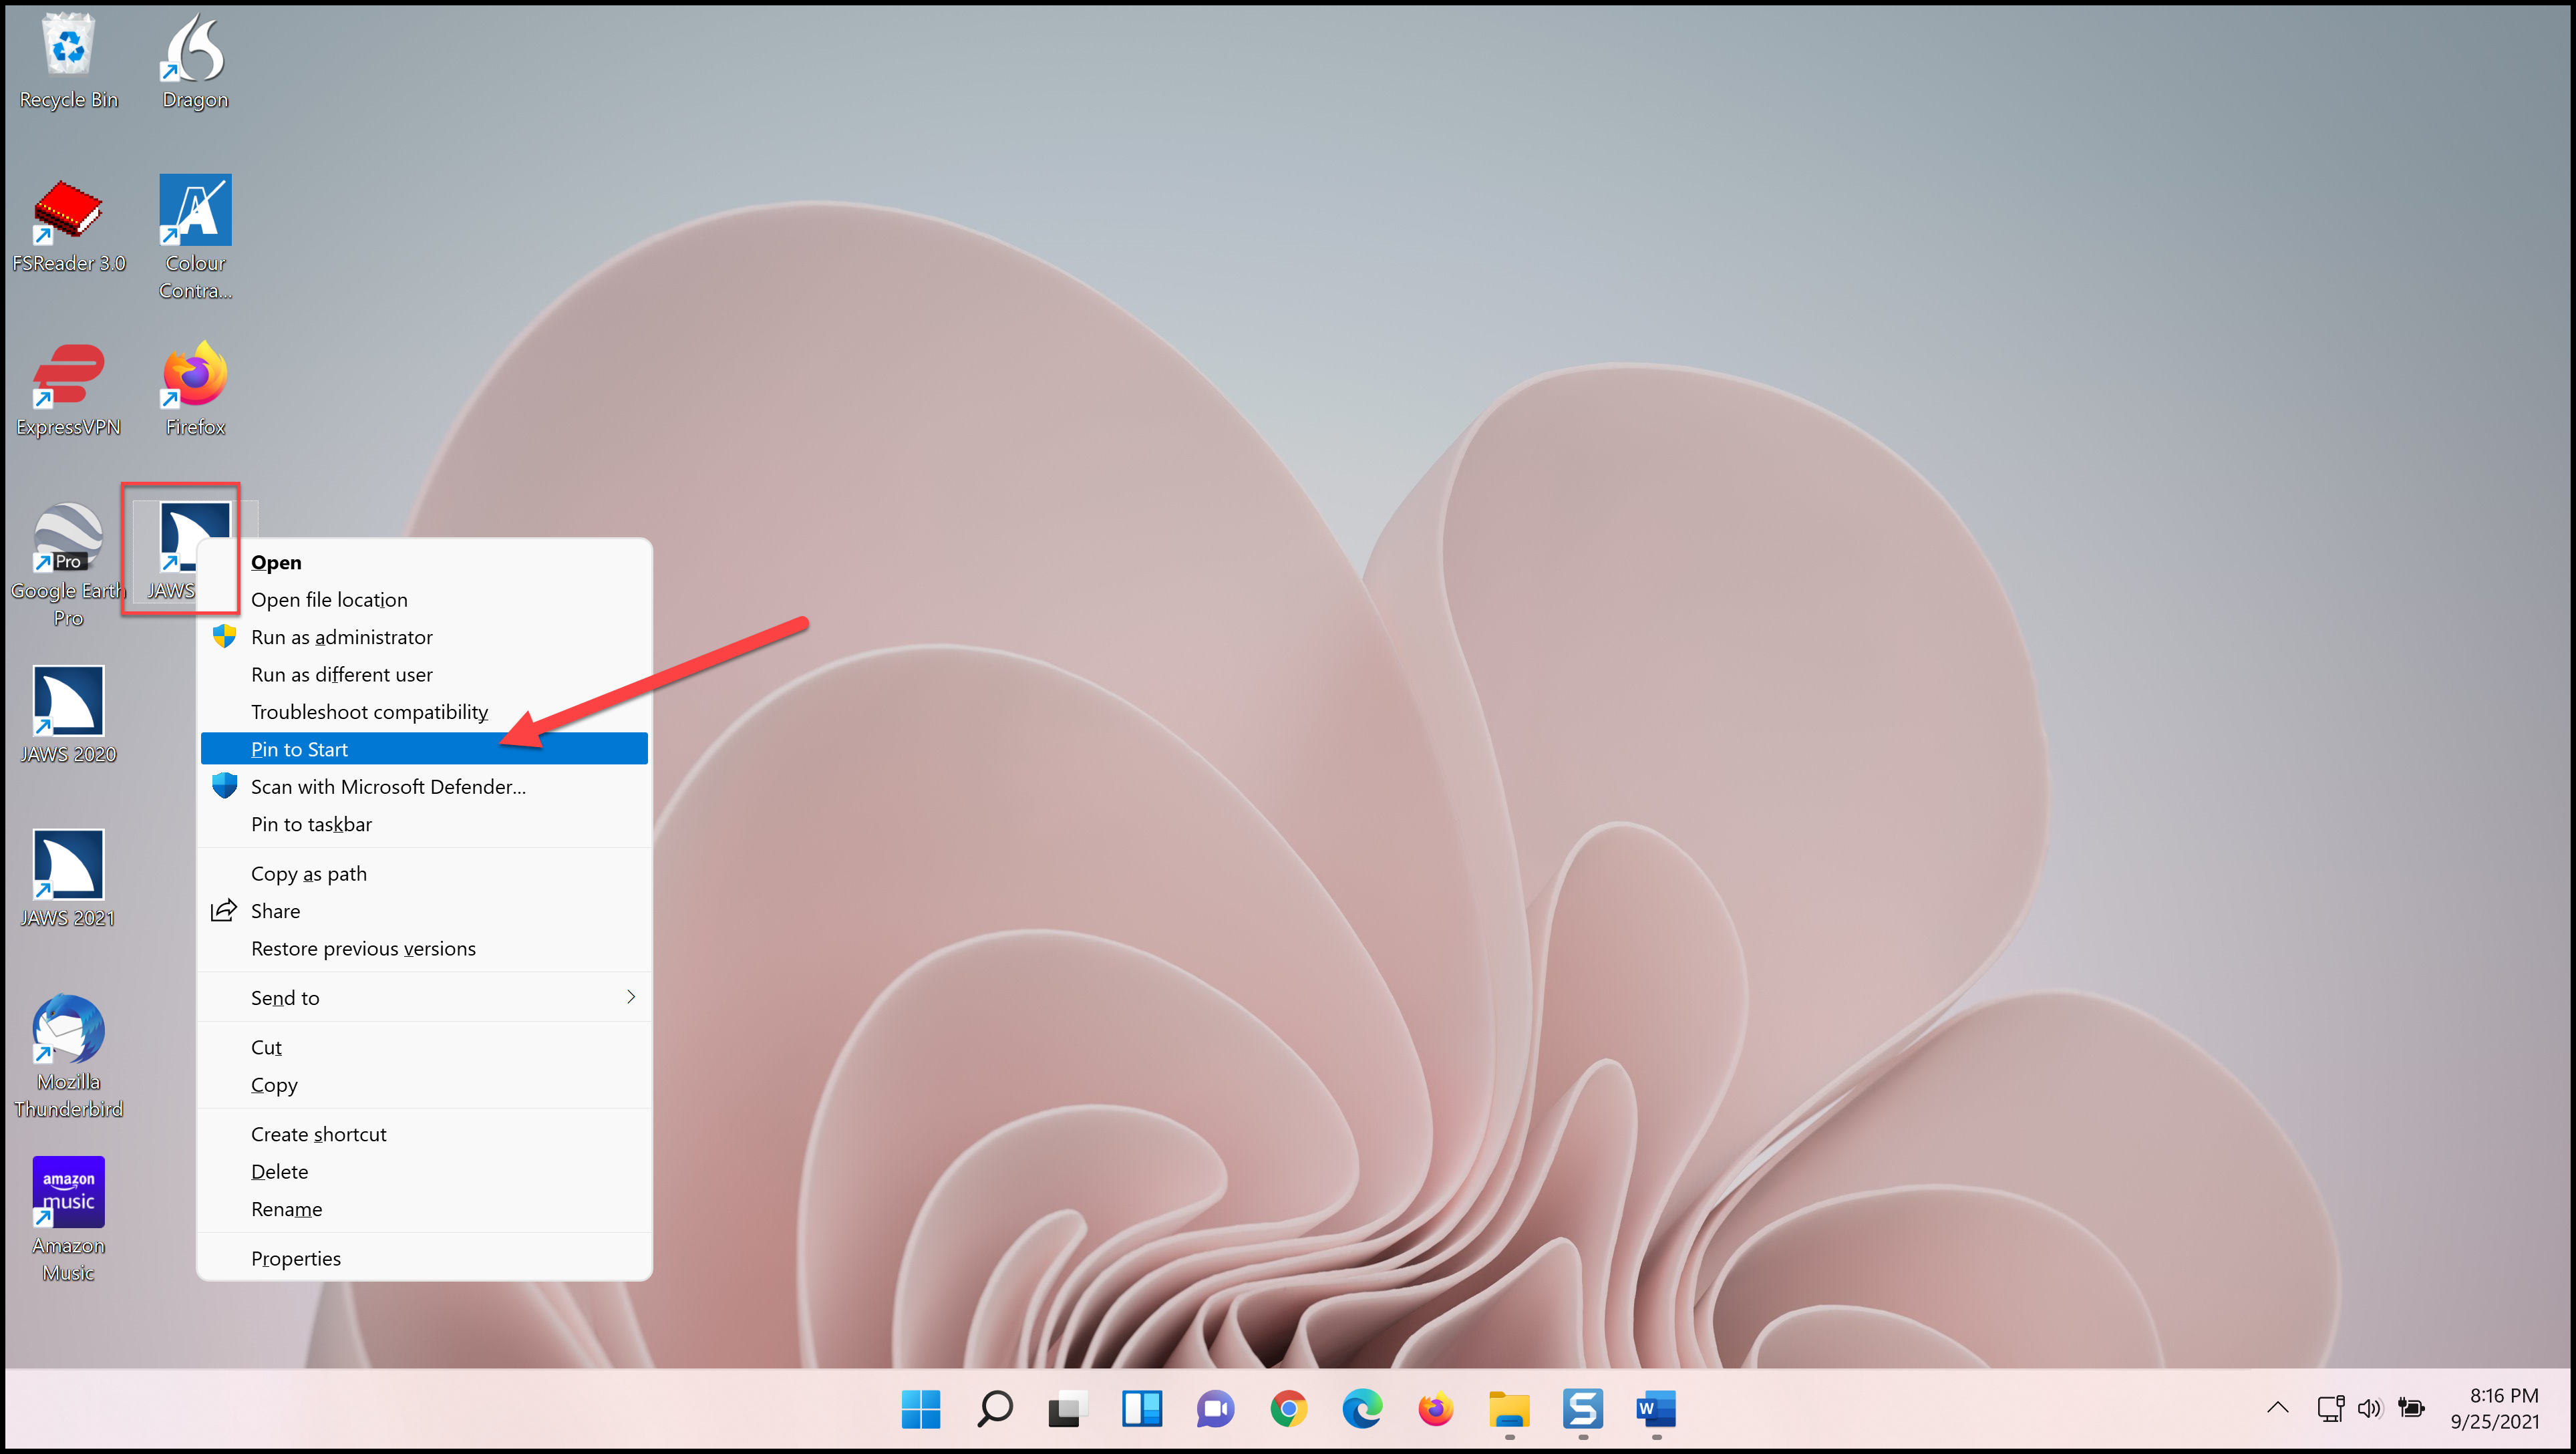
- Choose Pin to Start in the menu.
A button for JAWS 2022 has now been added to the Start menu pinned section.
Find and Pin an App from the Windows List of Apps
You may also use the Windows list of apps to find and pin apps to the Start menu.
- First, open the Start menu by pressing the WINDOWS key.
- Press TAB to move to the All Apps button, and then press SPACEBAR to activate it. The alphabetical list of apps on your computer opens.
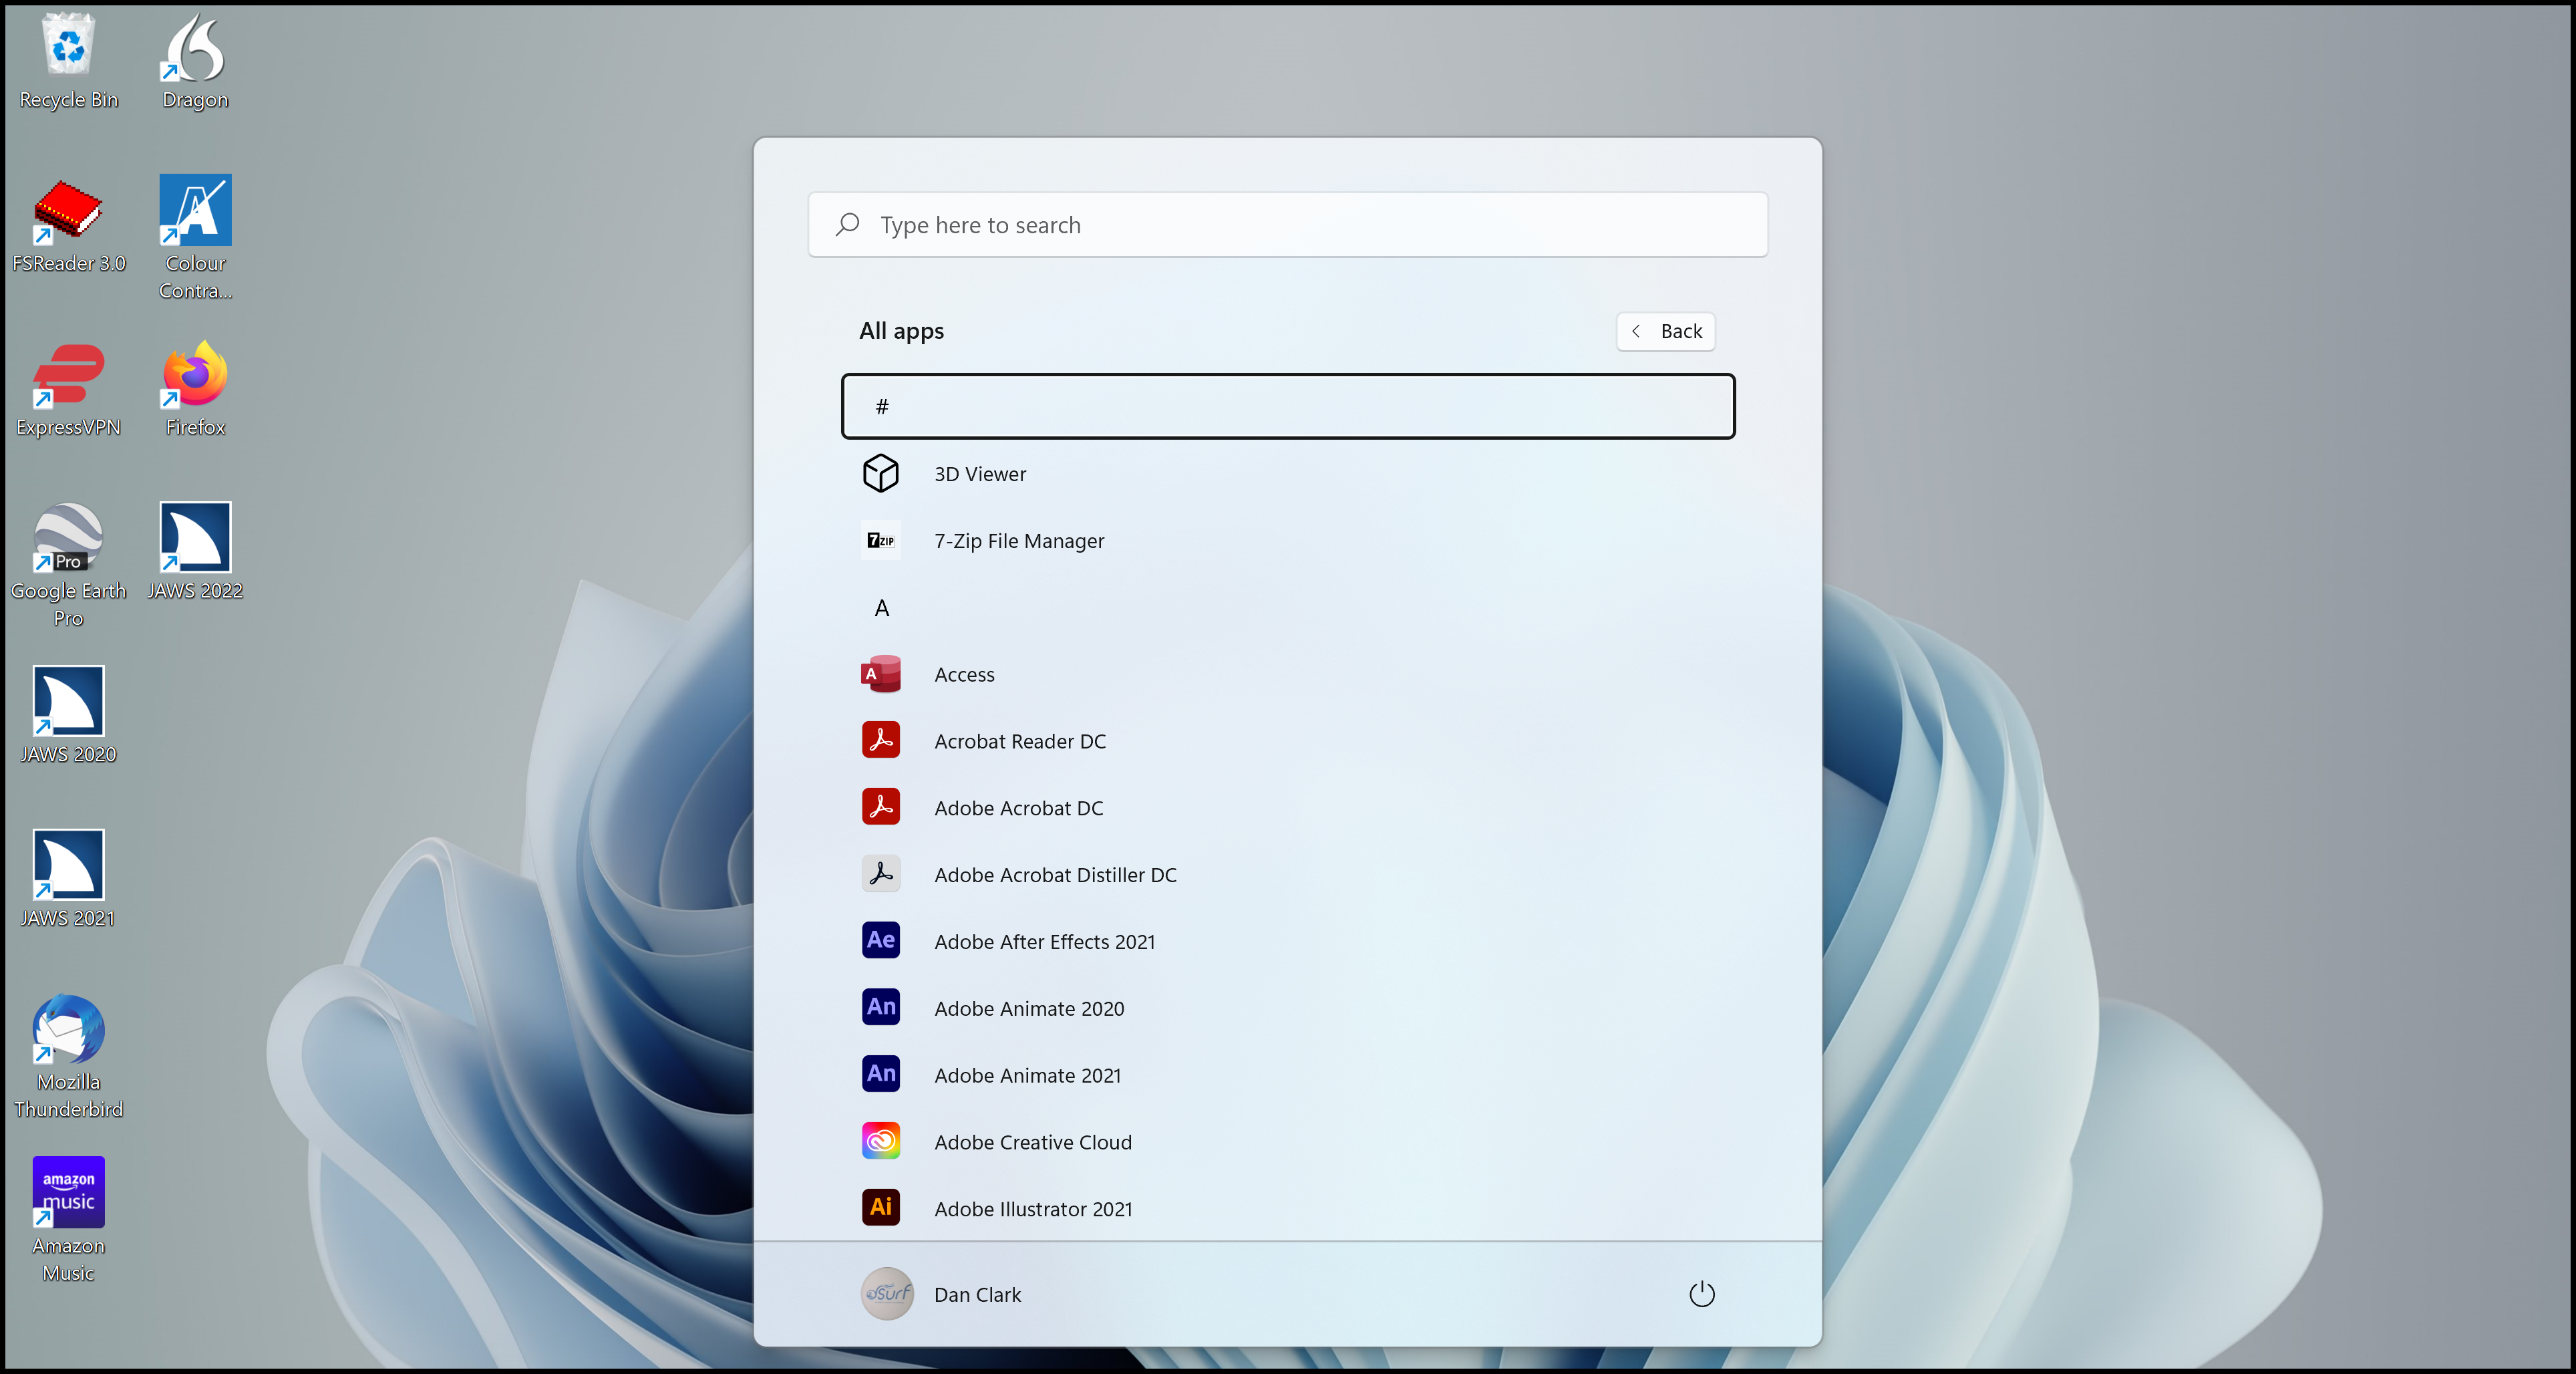
- Type the first letter of an app you are looking for. For this example, let us use the Calculator app. Type C for Calculator. There is the button to launch Calculator. If you were to press ENTER that would start Calculator.
- Open a context menu by pressing SHIFT+F10 or by right-clicking the Calculator button with a mouse.
If “Unpin from Start” is shown in the context menu on your PC instead of “Pin to Start,” that means the button for the app is already in the group of buttons pinned to the Start menu. For this practice, you may use any other app that is not already pinned to the Start menu. You can always unpin it later when you finish the lesson.
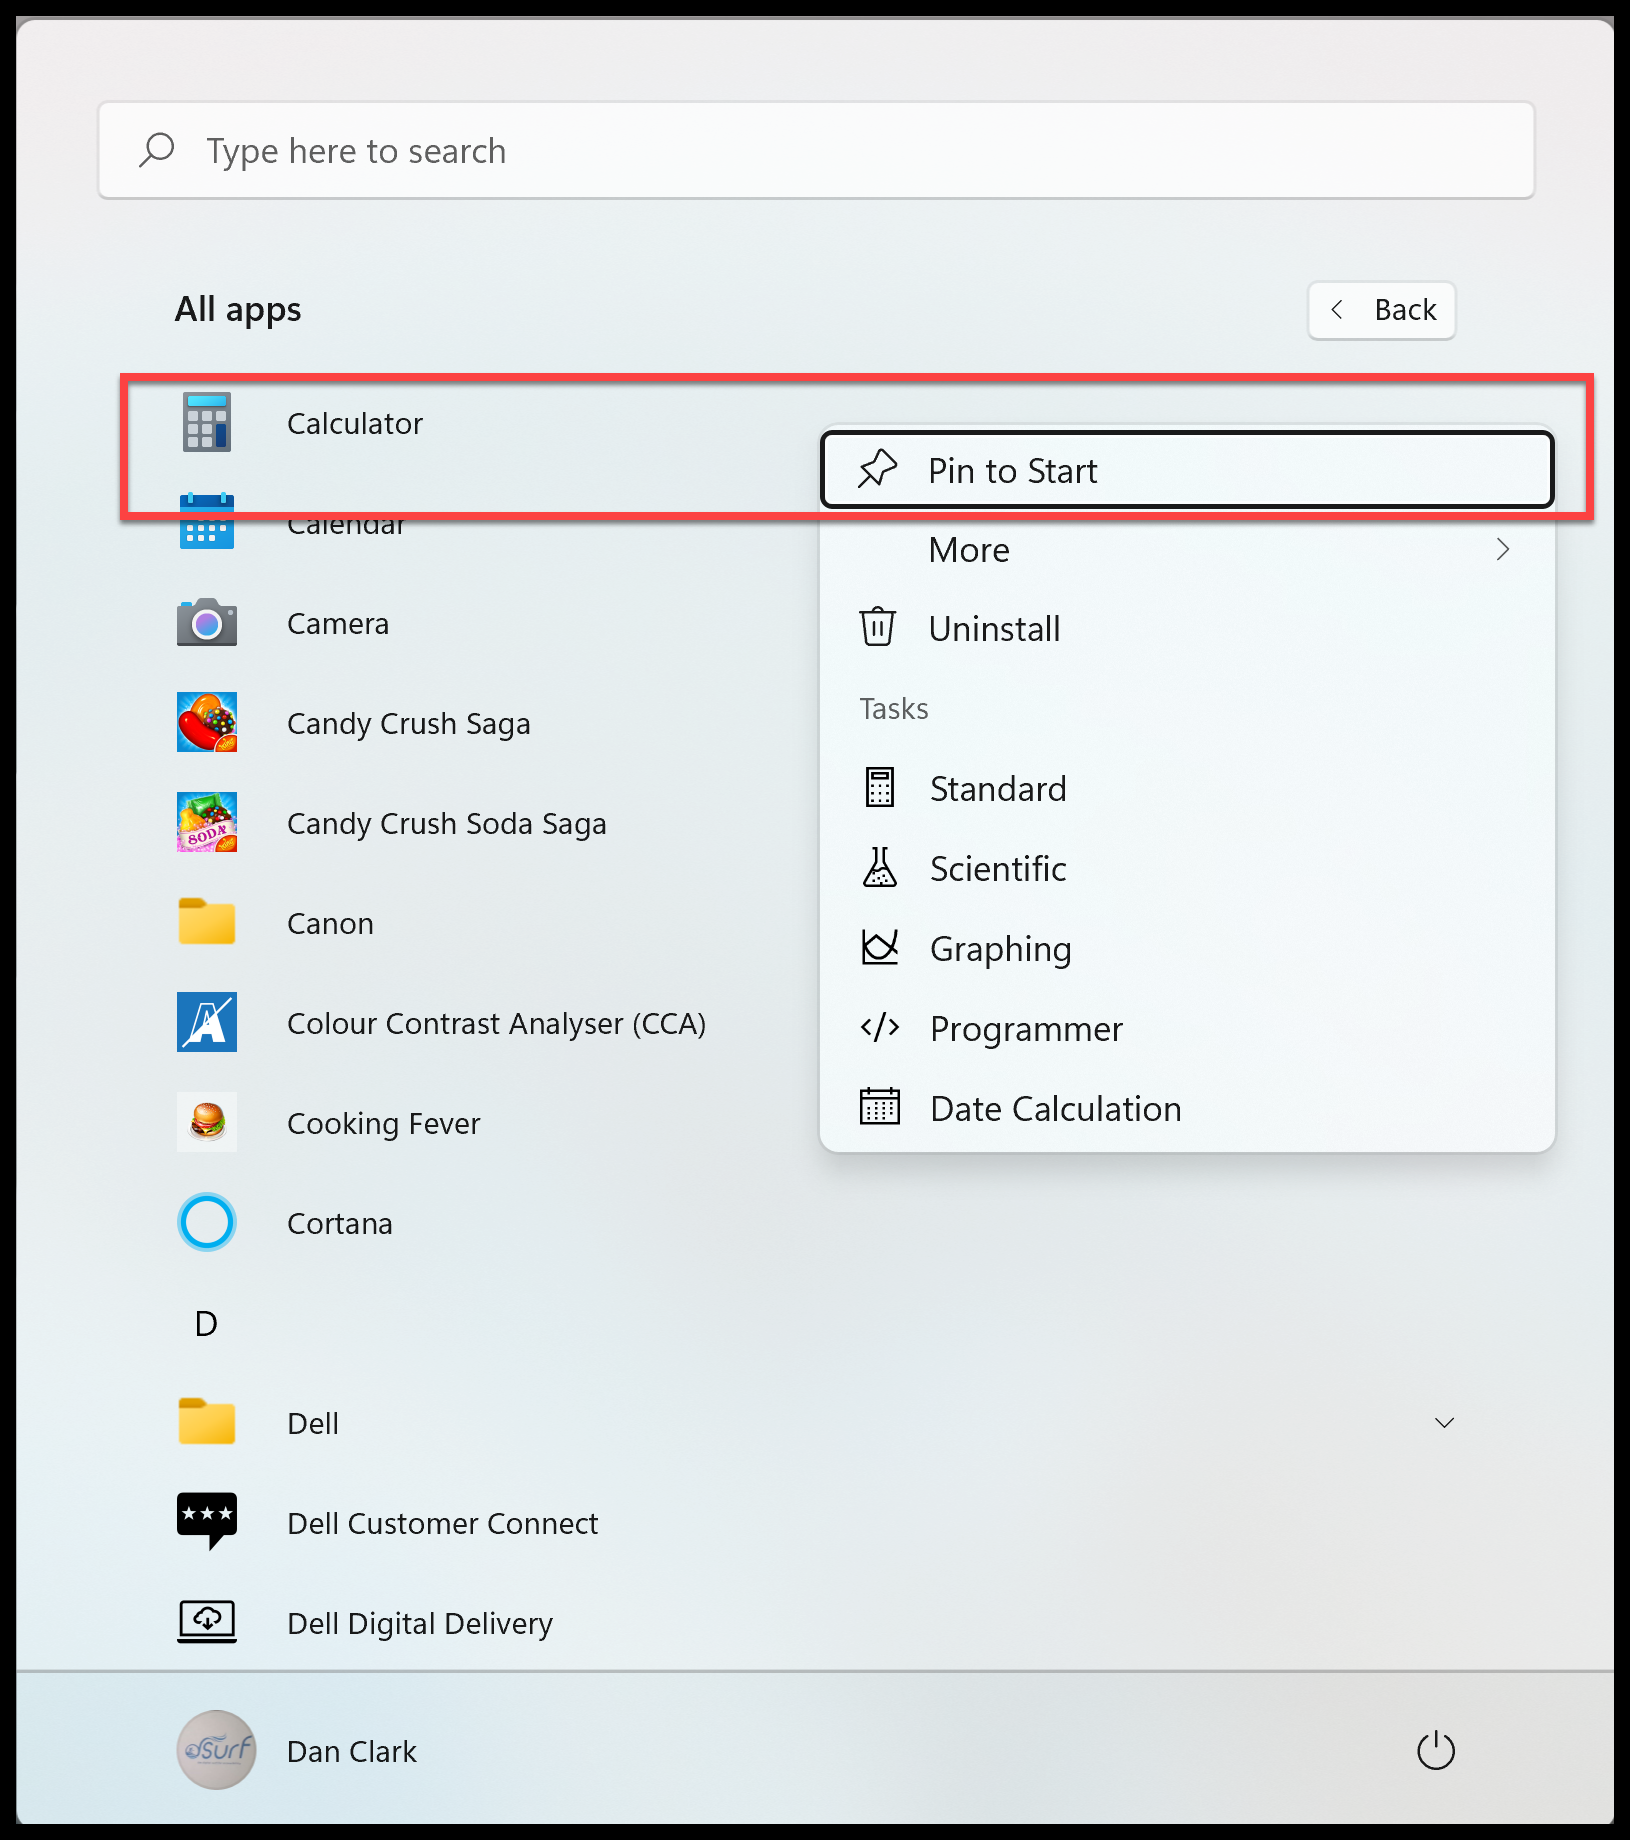
The other two items are a submenu for More and one for Uninstall. The More submenu contains Pin to Taskbar, Run as Administrator, and Open File Location. (Author’s Note: The choices here depend on the type of item selected, so they may be slightly different on your PC.)
- Activate the “Pin to Start” menu item by pressing ENTER or SPACEBAR.
The list of available apps remains open. Repeat this process to pin buttons for additional apps to the Start menu as needed.
It is important to note that the newly pinned buttons appear at the bottom of the list of pinned apps on the Start menu. We will move them to the top for easier access in the next step.
- When you are finished, press ESC to close the Start menu.
Arrange Pinned Items on the Start Menu
Rearranging the buttons on the Start menu with the most used apps at the top benefits low vision users who may be using screen magnification software, such as ZoomText. It also benefits screen reader users with touch screen devices as well as keyboard only users.
Once you have pinned new buttons to the Start menu, you can then arrange the buttons for apps you use most often at the top for easy access.
When you first pin an app to the Start menu it appears at the bottom of the list. There are a few ways to arrange pinned items in the Start menu, including using the context menu with SHIFT+F10 or a right mouse click, by clicking and dragging using the left mouse button, or by using the keyboard. Screen magnification and mouse users, feel free to click and drag the buttons in the pinned area of the Start menu at your convenience.
Use the Context Menu to Arrange Apps Pinned to the Start Menu
Next, use the context menu to move the Calculator button from the bottom of the Start menu to the top. Remember, when it was added a moment ago it appeared at the bottom of the list of pinned buttons.
- First, open the Start Menu by pressing the WINDOWS key, and then press TAB to move to the pinned app section.
- Press CTRL+END to move to the bottom of the list.
- Use the LEFT or RIGHT ARROW keys if necessary to find the Calculator button.
- Press the APPLICATION key to open a context menu.
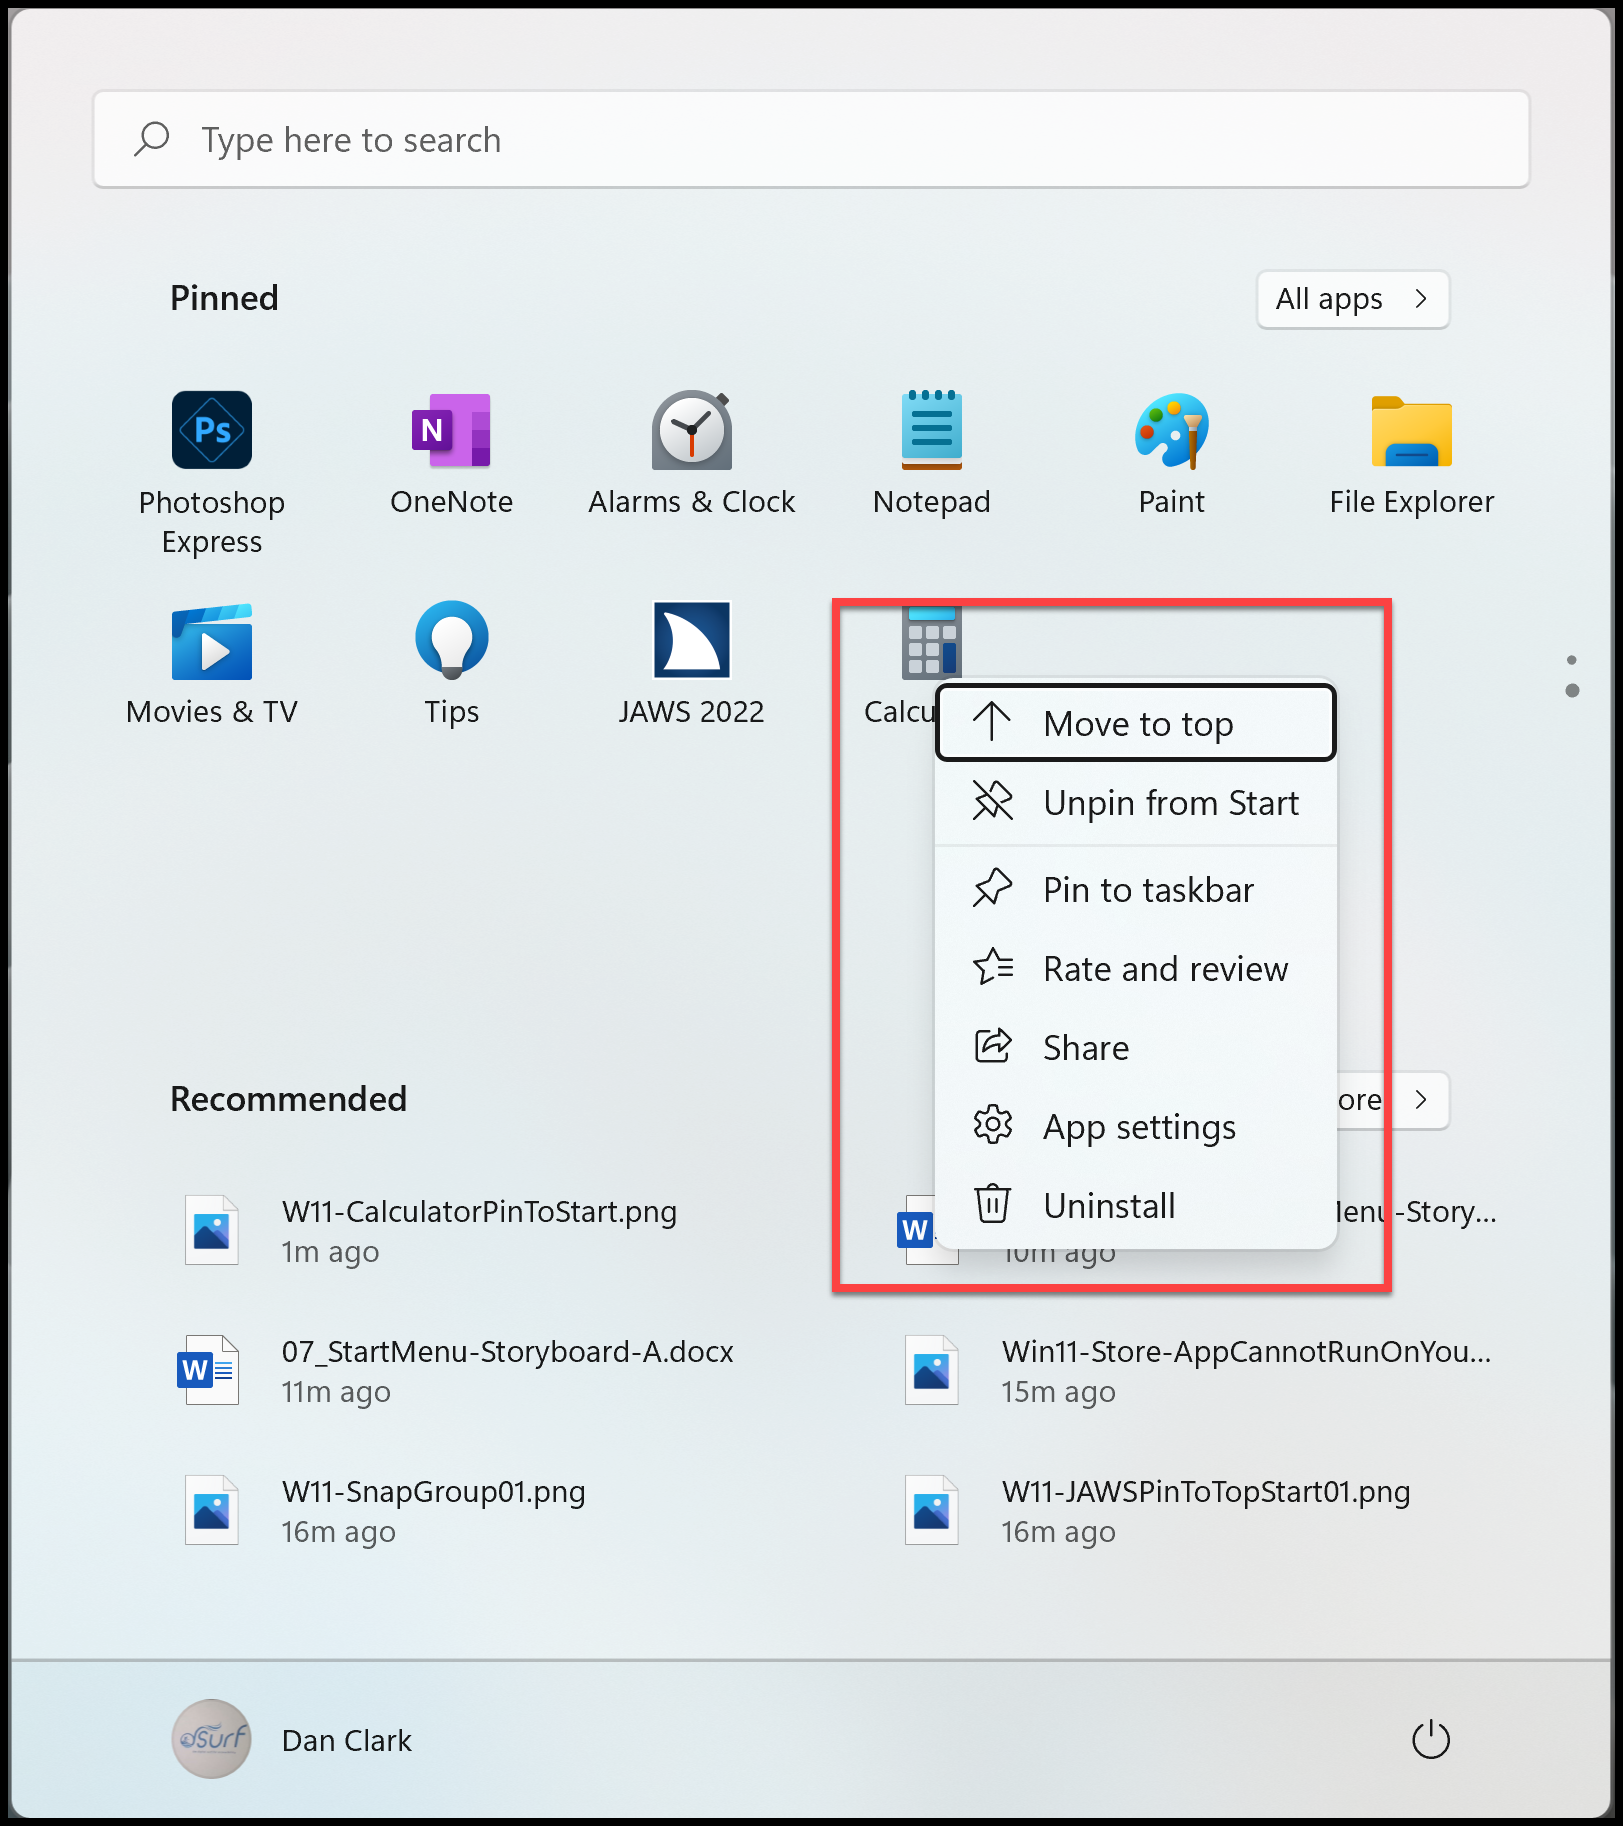
For all buttons in the list except the first one, the first menu choice in the context menu is “Move to Top.” (Author’s Note: In the latest iteration of Windows 11 23H2 this has changed to “Move to Front.”)
- Press ENTER or SPACEBAR on Move to Top.
Perfect! There it is at the top of the Start Menu. You may repeat this process to move more buttons from the bottom to the top of the Start Menu. However, note that as you move buttons to the top using this method, they always appear in the first slot, or position. In the next section we look at how to rearrange the buttons in the Start Menu pinned area.
Also note that pressing the DEL key will not remove pinned items, however you may choose to unpin items by using the context menu.
- For now, press ESC to close the Start Menu.
Use the Keyboard to Arrange Apps Pinned to the Start Menu
You just moved a button from the bottom of the Start Menu to the top. However, you may want to rearrange the buttons at the top of or elsewhere within the Start Menu individually. Here is how:
- First, open the Start Menu by pressing the WINDOWS key, and then press TAB to move to the pinned app section.
- Move focus to the button you want to rearrange by pressing RIGHT or LEFT ARROW. In this example, the button for Microsoft Word is number five in the list. Let us move it to the second position, just after the button for Calculator. Press RIGHT ARROW to move to the Word button.
- Focus is on the button. Press one of the following keystrokes:
- Move the pinned button one to the right, ALT+SHIFT+RIGHT ARROW
- Move the pinned button one to the left, ALT+SHIFT+LEFT ARROW
- Since you want to move the Word button to the left, press ALT+SHIFT+LEFT ARROW.
- JAWS did not speak anything. In this case, read the position of the button by pressing the JAWS say line keystroke, INSERT+UP ARROW.
- Great! Now press ALT+SHIFT+LEFT ARROW once more. Read the position of the button again by pressing the JAWS say line keystroke, INSERT+UP ARROW.
- Repeat this process one more time.
Excellent! Now you have added a new button to the Pinned section of the Start Menu and arranged the buttons on the top row in the order you prefer. Continue the process to arrange the buttons in the Start menu on your PC to your preference. When you are finished, press ESC to close the Start Menu.
Thank you for joining me in this lesson on pinning and arranging buttons within the Start menu in Windows 11.