
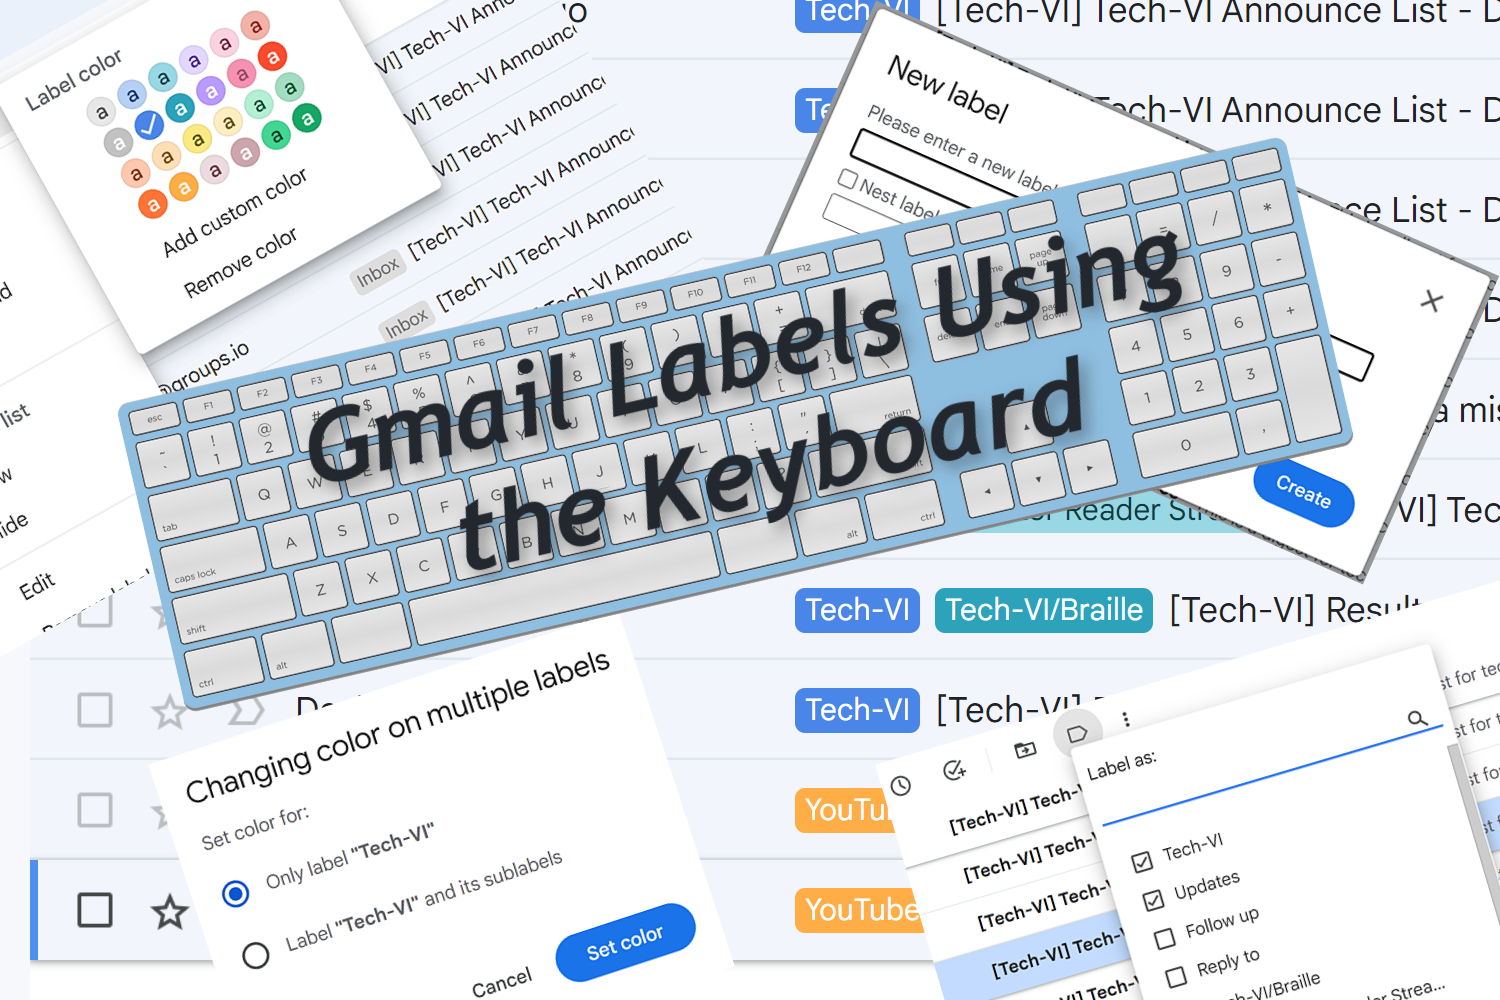
Introduction
Labels in Gmail can be used to categorize the different email conversations you send or receive. You can create as many labels as you need and give them unique names. You can create sublabels or nested labels which reside beneath other labels, and more. In this lesson, you learn all about labels in Gmail and how to transform the default grey on grey labels into labels with bright colors to help you see them better.
Resources
Table of RGB Label Text Colors in Gmail Used In This Lesson
ZIP file of all resources (Alternatively, download individual files above. YouTube video not included in ZIP file to keep size smaller.)
Objectives
By the end of this lesson you will understand, be able to discuss, and/or perform the following tasks as they relate to creating and using labels in Gmail:
- What labels are and how they are used
- Creating and adding labels to messages
- Nesting labels
- Adding color to labels
- Removing or deleting labels
- Searching with labels
- Creating a filter to move messages out of the inbox using a label
Table of Contents
Creating and Applying Labels
- Creating A New Label
- Adding Labels
- Add an Existing Label to a Message Received in a List View
- Add an Existing Label to an Open Message While Reading
- Add an Existing Label to a Message Received and Move it into that Label
- Add an Existing Label to an Outgoing Message During Composition
- Selecting Multiple Items Prior to Applying a Label
Mouse Drag and Drop with Labels
Nesting Labels
- Nesting Labels – Creating Sublabels; Create and Add a Sublabel to an Individual Open Received Message
- Create and Add a Sublabel To an Incoming Message in a List View
Label Colors in Gmail
- Label Colors in Gmail; RGB Values, 24 Choices
- Table of RGB Label Colors in Gmail
- Adding Color to Labels
Removing or Deleting Labels
- Removing or Deleting Labels
- Remove a Label From All Emails
- Delete a Label From a Message In a List View
- Delete a Label From Multiple Selected Messages in a List View
- Delete a Label From an Open Email
Search and Create Filters with Labels
- Search and Create Filters with Gmail Labels
- Search all Messages with a Certain Label
- Search for Words or Phrases Within a Label
- Clear Search Results in Gmail
- Using the Advanced Search Options with Labels
- Create a Filter to Move Messages Out of the Inbox and Add a Label
Delete a Filter
Creating A New Label
This button opens the
It opens in a new window and allows you to play/pause the video in a different window while reading the instructions on this page.
- From within the Inbox and with no messages selected move to the Select button submenu in the Toolbar near the top of the screen by pressing the COMMA key.
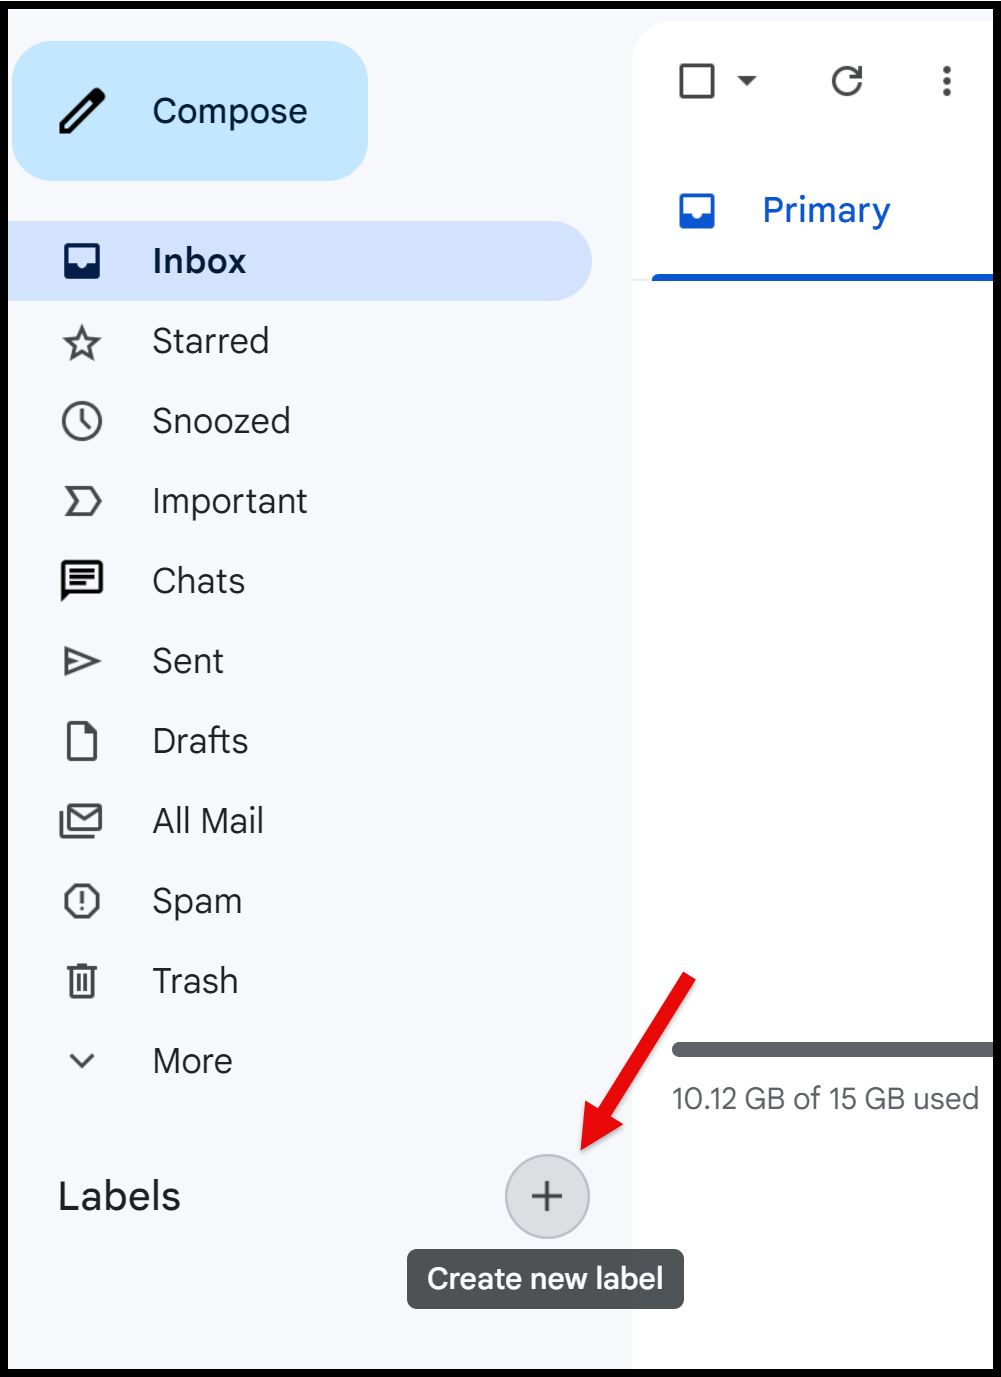
- Move to the “Create New Label” button by pressing SHIFT+TAB.
- Press ENTER. The Create New Label dialog box opens. Focus is in the “Please enter a new name” edit box.
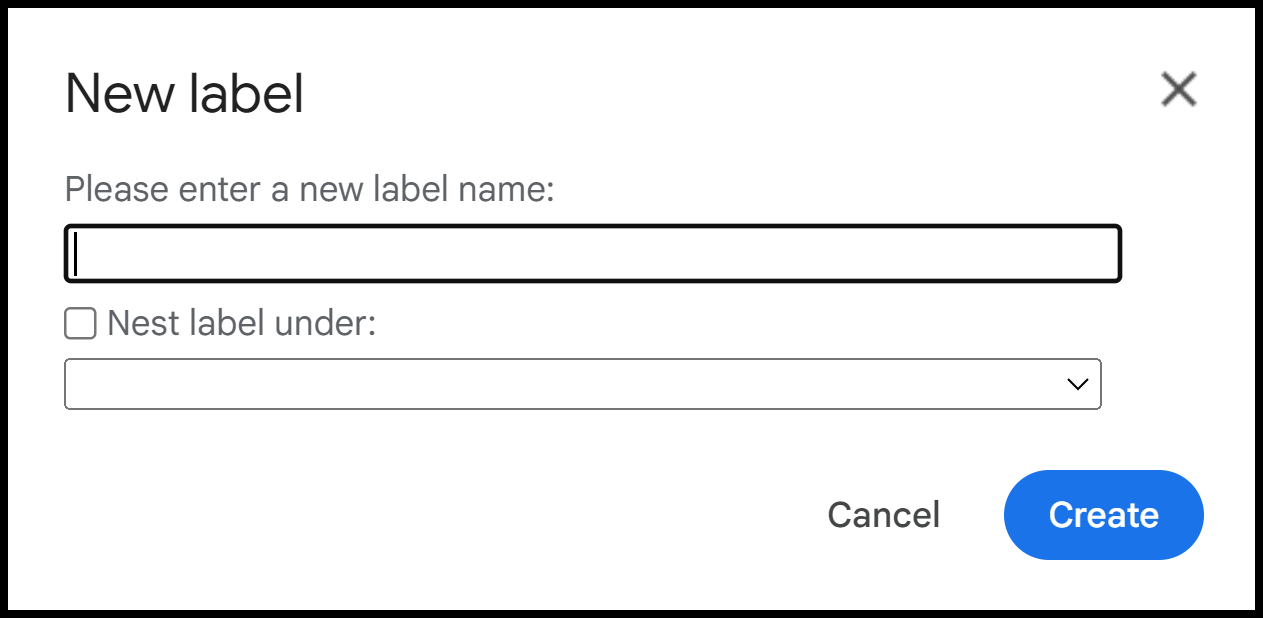
- Type a name for your new label. I will create one called “Reply To,” since I like to move messages out of my inbox and reply to them later.
- Move to the “Create” button while exploring the other two items in tab order first by pressing the TAB key. They are the check box for “Nest label under” and the combo box which shows other labels that the new label can be nested under. We cover nested labels later in the lesson, so for now, just activate the Create button. The “Create” button is the default button, so in the future when you create new labels at the first level you can press ENTER to activate the Create button instead of pressing TAB to move to it first.
The dialog box closes, and the new label is now added to the navigation panel menu list in alphabetical order on the left side of the screen just below the last “Labels” level two heading on the page.
- I am going to add a few more labels for practice during this session. Focus is on the “Create new label” button. Press ENTER.
- This time I will name the new label “YouTube.” Press ENTER to activate the Create button. The dialog box closes, and the new label is now added to the navigation panel menu list.
For additional practice in this lesson, I will create the following labels now:
- Follow up
- Technology
- Tech-VI
- Testing
- Training
Feel free to pause the lesson now and create a few labels that you might find useful. When you are finished, remember to press ESC to remove the focus from the “Create new label” button and return to the Inbox or other list view.
Adding Labels
- You can add labels to incoming or outgoing messages
- Add a label while moving a conversation
- Apply labels to multiple items in one step
- And much more
Add an Existing Label to a Message Received in a List View
Following the steps for this undertaking does not move the conversation from the current location, nor does it change other labels with which it may be associated. You may have as many labels as you wish for a single email conversation.
- Select an email from the list by pressing the letter X. On my PC focus is in the Inbox.
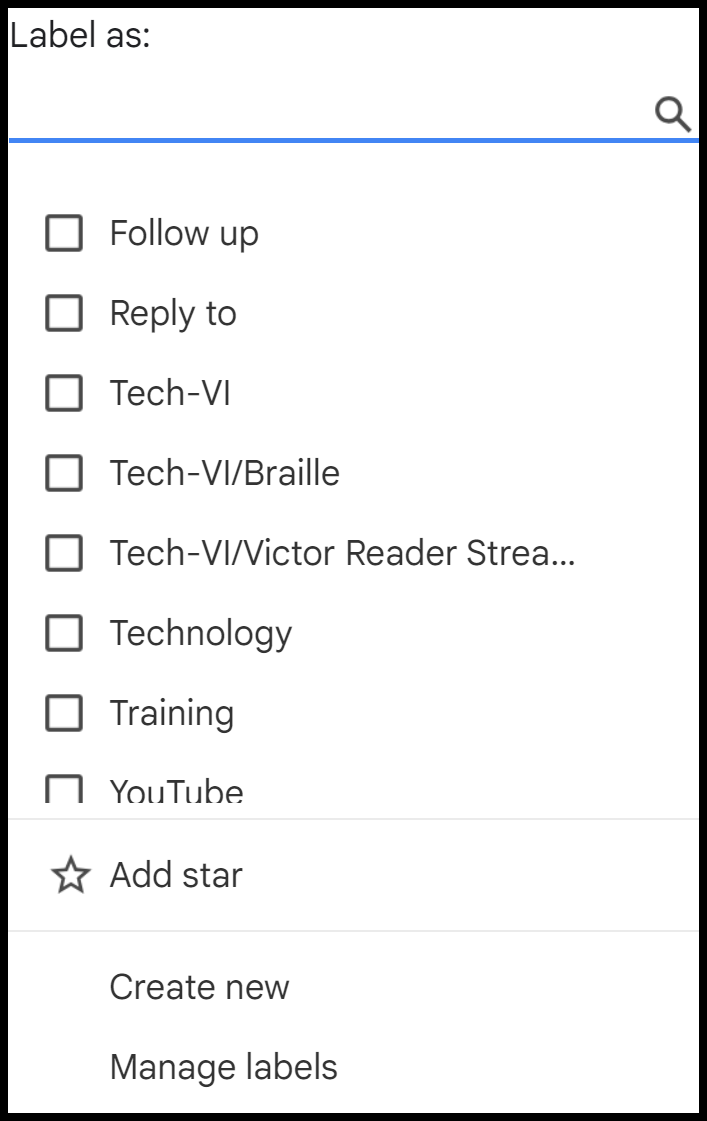
- Open the “Label As” button dialog by pressing the letter L.
- Press UP or DOWN ARROW to choose a label, and then press ENTER. The label is applied.
- Focus is on the Labels button menu. Press ESC to remove focus from the toolbar.
- Deselect the current item in the list by pressing the letter X unless you plan to perform other actions.
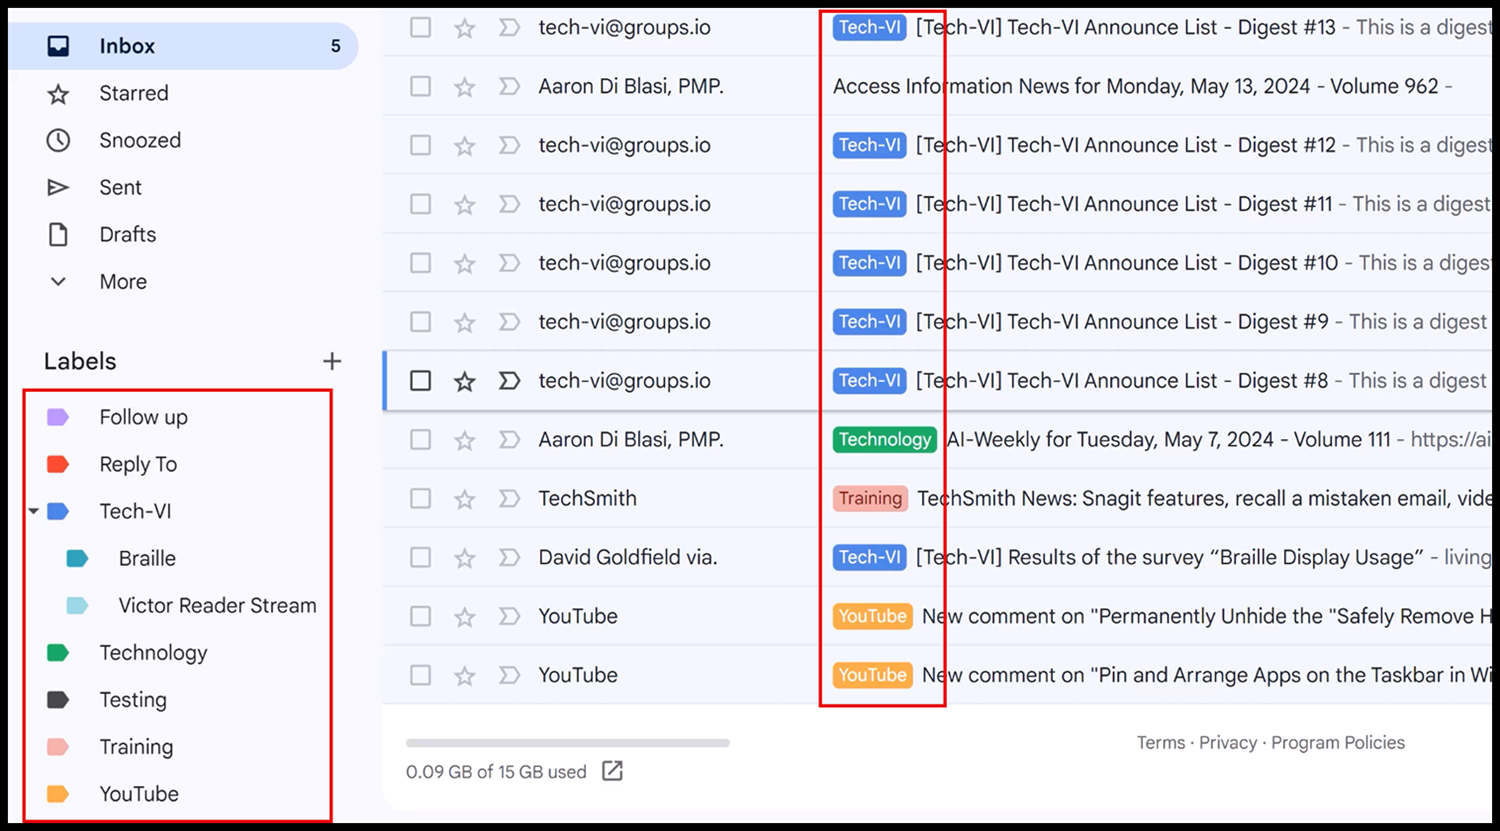
Labels initially look like a rectangular stick-on label with rounded corners. By default, the text of the label name appears in darker grey on a lighter grey background.
Changing label colors is discussed later in the lesson. The longer the label name, the wider the label appears. Labels appear in the list view as part of the message header information between the sender’s name and the subject.
In an open message the labels appear in the message header at the end of the subject line. In an open email, you may press the tab key to move from the subject to any attached labels in the header.
Add an Existing Label to an Open Message While Reading
The steps for adding a label to an open message while reading are basically the same as above.
- I have an email currently open from one of the groups I subscribe to, Tech-VI. Open the “Label As” button dialog by pressing the letter L.
- I will add this to the Tech-VI label I created earlier. Press UP or DOWN ARROW to choose a label, and then press ENTER.
The label is applied. Focus returns to the Labels button menu. Press ESC to remove focus from the toolbar.
Add an Existing Label to a Message Received and Move it into that Label
- From the Inbox, select an unopen email in the list by pressing the letter X. I have focus on another email from the Tech-VI group that I want to apply the Tech-VI label to. But in this case, I also want to move the message from the Inbox and place it in the label Tech-VI.
- Open the “Move To” button menu by pressing the letter V.
- Press UP or DOWN ARROW to select the label you want to move the message to, and then press ENTER.
The email is moved to the label you chose. The conversation now has the label added for Tech-VI and it has also been moved from the Inbox to the Tech-VI label.
Add an Existing Label to an Outgoing Message During Composition
You can add a label to a message you are composing. The recipient will not see the label, but you can still search for the message later in your sent mail items, etc., using the label.
- Begin composing a new email in Gmail by pressing the letter, C.
- When the new message opens, move to the “More Options” button near the bottom of the message by pressing SHIFT+TAB several times.
- Press ENTER. The More Options menu opens.
- Move down the list by pressing DOWN ARROW to the “Label” submenu, and then press ENTER. The Label As dialog box opens.
- I will choose “Follow up” so I can search for that label later.
- Focus returns to the “More options” button. Move back to the “To” edit box by pressing TAB several times and continue composing the email as you normally would.
Selecting Multiple Items Prior to Applying a Label
You can save time when applying labels to multiple items in a list of messages by first selecting the items of interest by pressing the letter X while moving up and down the list, and then adding the label. The label, or labels, are applied to all selected items at once.
- Focus is in the inbox. I will select a couple more of the emails from the Tech-VI group.
- Next, press the letter L to open the Label as submenu.
- Press DOWN ARROW to move to the label you want to apply, and then press ENTER.
- Press ESC to remove focus from the Labels button in the toolbar at the top of the screen. Also remember to deselect any messages you selected unless you plan to perform other actions on them.
Mouse Drag and Drop with Labels
For those of you who may use a mouse with a screen magnification app such as ZoomText or Windows Magnifier, some basic mouse instructions are provided as part of the lesson.
This button opens the
It opens in a new window and allows you to play/pause the video in a different window while reading the instructions on this page.
Drag an Existing Label to a Message in a List View
Drag And drop a label from the navigation panel menu list on the left side of the screen onto an email in the Inbox (or other list view). The label is added to the email. The email remains in the current label with the new label added and is not moved.
Drag and Move a Message from a List into an Existing Label
Drag and drop an email from the Inbox (or other list view) onto a label in the left column navigation panel menu list and the email is moved to that label. It no longer resides in the Inbox or prior list.
Remove a Label from an Open Message (Mouse Demo)
When an open message has a label that you want to remove, hover the mouse pointer over the label in the subject line near the top of the message and click the “Remove label” button marked X.
Nesting Labels – Creating Sublabels
This button opens the
It opens in a new window and allows you to play/pause the video in a different window while reading the instructions on this page.
Create and Add a Sublabel to an Individual Open Received Message
I have a message opened in Gmail from the Tech-VI group and I have previously added the parent label (in this case, Tech-VI) to the message. Sublabels have the following text format: ParentLabel/SubLabel.
Creating a new sublabel and adding it to a message does not automatically add the parent label to the message. The parent label name is appended as part of the sublabel name, but the parent label is a separate entity, and must be added to the conversation separately.
As I read this message, I see there are other topics that I may want to read more about later. I want to create a sublabel for the Tech-VI group and add it to this message.
- Open the “Label As” button menu by pressing the letter L.
- Choose “Create New” in the list, and then press ENTER. I will press UP ARROW to find it since it is closer to the bottom of the menu.
- Type a name for the new label, which will soon become a sublabel. I will name this one “Braille” since there are a couple of articles in this email dealing with braille.
- Move to the “Nest label under” check box by pressing TAB, and then press SPACEBAR to check it.
- Move to the “Please select a parent” combo box by pressing TAB, and then press DOWN ARROW to move through the list. You may also press ALT+DOWN ARROW to open the list and then use the UP or DOWN ARROW keys to explore it.
- Move to the “Create” button by pressing TAB, and then press ENTER to activate it.
The dialog box closes, and the new sublabel is added to the parent label you just selected. It also appears now in the navigation panel menu list on the left side of the screen nested beneath the parent label.
Create and Add a Sublabel To an Incoming Message in a List View
- Instead of opening a message, select one in a list view (or more to perform a bulk action) by pressing the letter, X. I will select another one of the Tech-VI emails.
- Open the “Label As” button menu by pressing L.
- Choose “Create New” in the list, and then press ENTER.
- Type a name for the new label, which will soon become a sublabel. For this one, I will type “Victor Reader Stream” since I know this message has a topic on this device.
- Move to the “Nest label under” check box by pressing TAB, and then press SPACEBAR to check it.
- Move to the “Please select a parent” combo box by pressing TAB, and then press DOWN ARROW to move through the list. You may also press ALT+DOWN ARROW to open the list and then use the UP or DOWN ARROW keys to explore it.
- When you have selected the parent label, move to the Create button by pressing TAB, and then press ENTER to activate it.
The dialog box closes, and the new sublabel is added to the parent label you selected. It also appears now in the navigation panel menu list on the left side of the screen nested beneath the parent label. Remember to deselect the current item in the list by pressing the letter X unless you plan to perform other actions.
Label Colors in Gmail
RGB Values, 24 Choices
This button opens the
It opens in a new window and allows you to play/pause the video in a different window while reading the instructions on this page.
The Gmail label color palette has four rows and six columns. The color swatches appear as small circles with a lower-case letter “a” (alpha) displayed on the different background color of each swatch. The foreground text colors vary according to the different background colors. Below the color swatches you find “Add custom color” and “Remove color” links. The “custom color” option allows a bit more flexibility in that you may also change the text color in addition to the background color for labels.
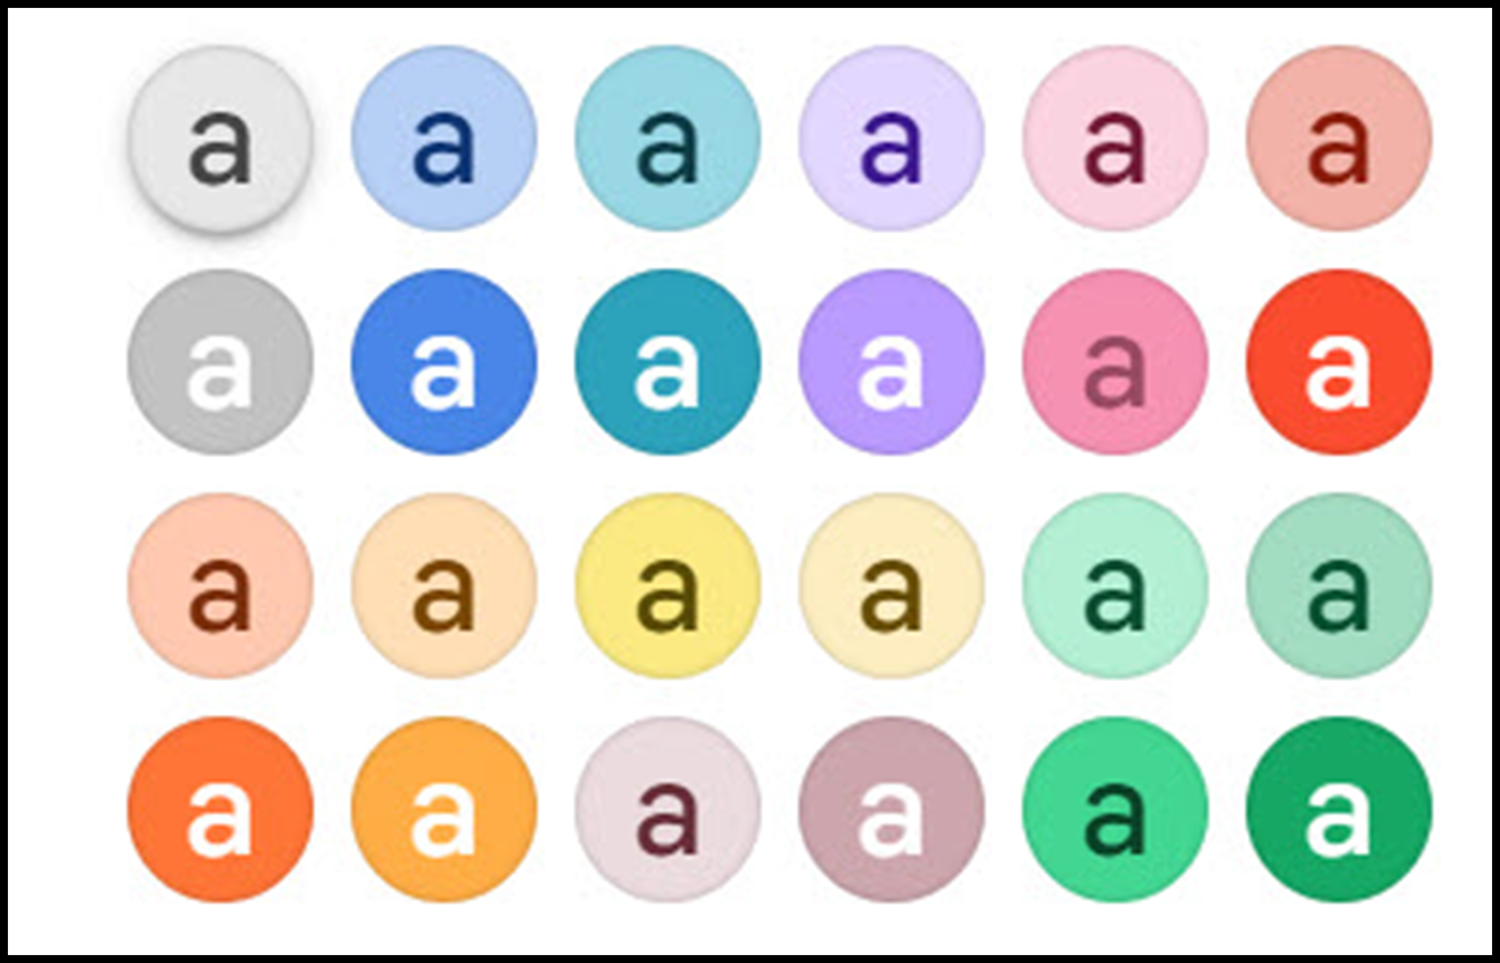
At the time of this recording there are no text labels for the color swatches, so when using a screen reader, one only hears the red, green, and blue (RGB) color values. Mouse users will notice on mouseover a tooltip with the RGB values that visually appears. In the table included with the lesson documentation, the first column contains the suggested background color for the labels, which were provided by Chat GPT artificial intelligence. The second column contains the RGB values for that color from the Gmail color palette. Please note that the reproduction of color can vary on different screens, so the suggested color names provided in this lesson may slightly differ for different viewers.
| Color Name | RGB Value |
|---|---|
| Light grey, R1C1 | 231, 231, 231 |
| Light blue, R1C2 | 182, 207, 245 |
| Light teal, R1C3 | 152, 215, 228 |
| Light purple, R1C4 | 227, 215, 255 |
| Light pink, R1C5 | 251, 211, 224 |
| Light coral, R1C6 | 242, 178, 168 |
| Dark gray, R2C1 | 194, 194, 194 |
| Dark blue, R2C2 | 73, 134, 231 |
| Dark teal, R2C3 | 45, 162, 187 |
| Dark purple, R2C4 | 185, 154, 255 |
| Coral pink, R2C5 | 246, 145, 178 |
| Bright red, R2C6 | 251, 76, 47 |
| Peach, R3C1 | 255, 200, 175 |
| Beige, R3C2 | 255, 222, 181 |
| Yellow, R3C3 | 251, 233, 131 |
| Light yellow, R3C4 | 253, 237, 193 |
| Soft green, R3C5 | 179, 239, 211 |
| Pale green, R3C6 | 162, 220, 193 |
| Dark salmon, R4C1 | 255, 117, 55 |
| Dark orange, R4C2 | 255, 173, 70 |
| Greyish purple, R4C3 | 235, 219, 222 |
| Light mauve, R4C4 | 204, 166, 172 |
| Medium green, R4C5 | 66, 214, 146 |
| Dark green, R4C6 | 22, 167, 101 |
Adding Color to Labels
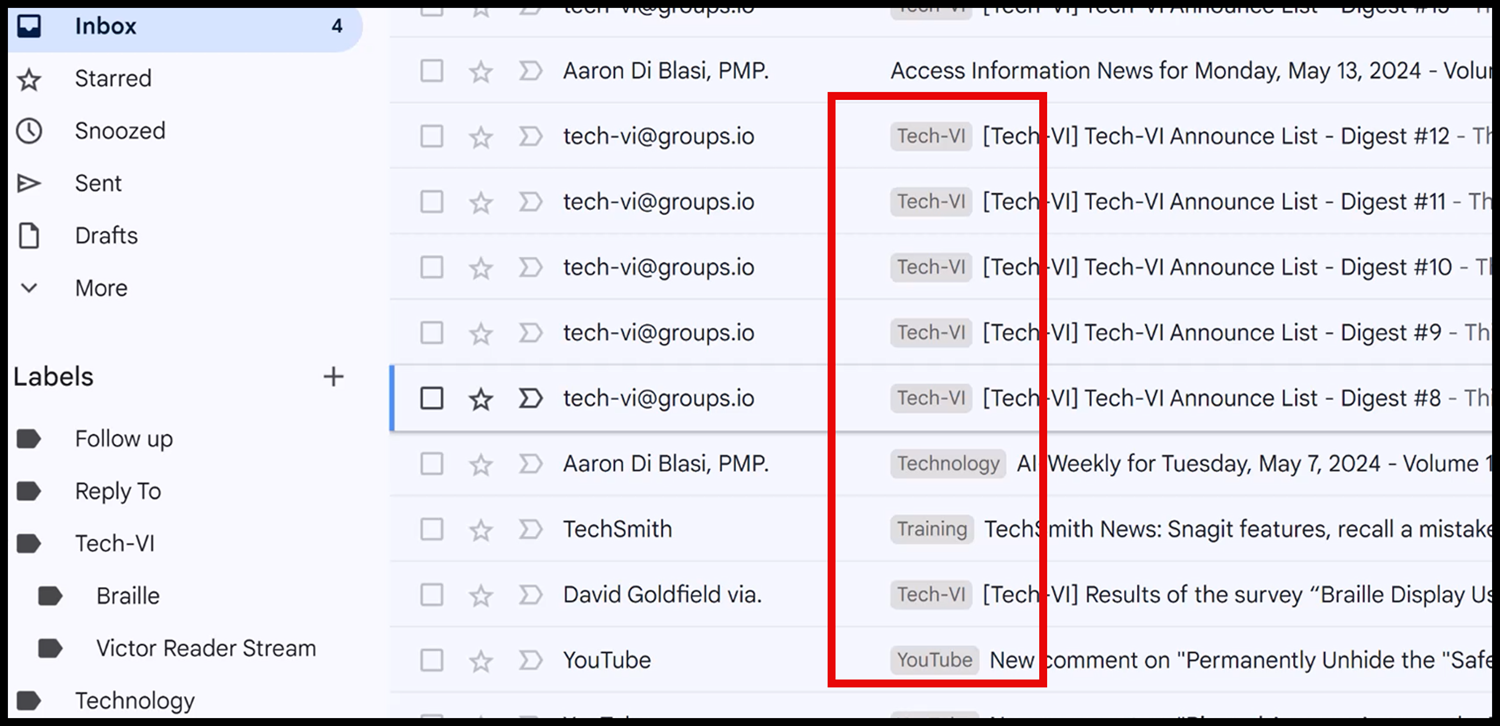
Once labels have been created you may add assorted colors to each label to make them easier to see. Labels by default have medium grey text for the name on a light grey background, which may make it difficult for some people to easily distinguish.
To change the color of labels, do the following:
- From the Inbox move focus to the Select button on the toolbar near the top of the list by pressing the COMMA key (,). JAWS reads it as “Select button menu.”
Do not open the button.
- Move to the “Create New Label” button in the navigation panel menu list on the left side of the screen by pressing SHIFT+TAB. You may need to press SHIFT+TAB several times if focus is not in the Inbox, since an extra search refinement tool bar is present near the top of the screen in other labels such as in All Mail or Sent items. Any labels you have previously created are below this button.
- Press DOWN ARROW to move through the labels you have previously created.
- Once you have selected a label you wish to change the color for, press TAB one time. Focus is on a hamburger menu button. Mouse users can hover the mouse pointer over the label in the navigation panel to show the hamburger menu button.
- Press ENTER on the hamburger menu button or left click it with the mouse. A submenu opens with the label color submenu at the top.
- Open the “Label color” submenu by pressing ENTER. A color swatch grid opens with 24 colors in four rows and six columns. Below the color swatch grid are links for “Add custom color” and “Remove color.” Upon opening the grid for the first time the first one, row one and column one, is the default darker grey text on a light grey color background.
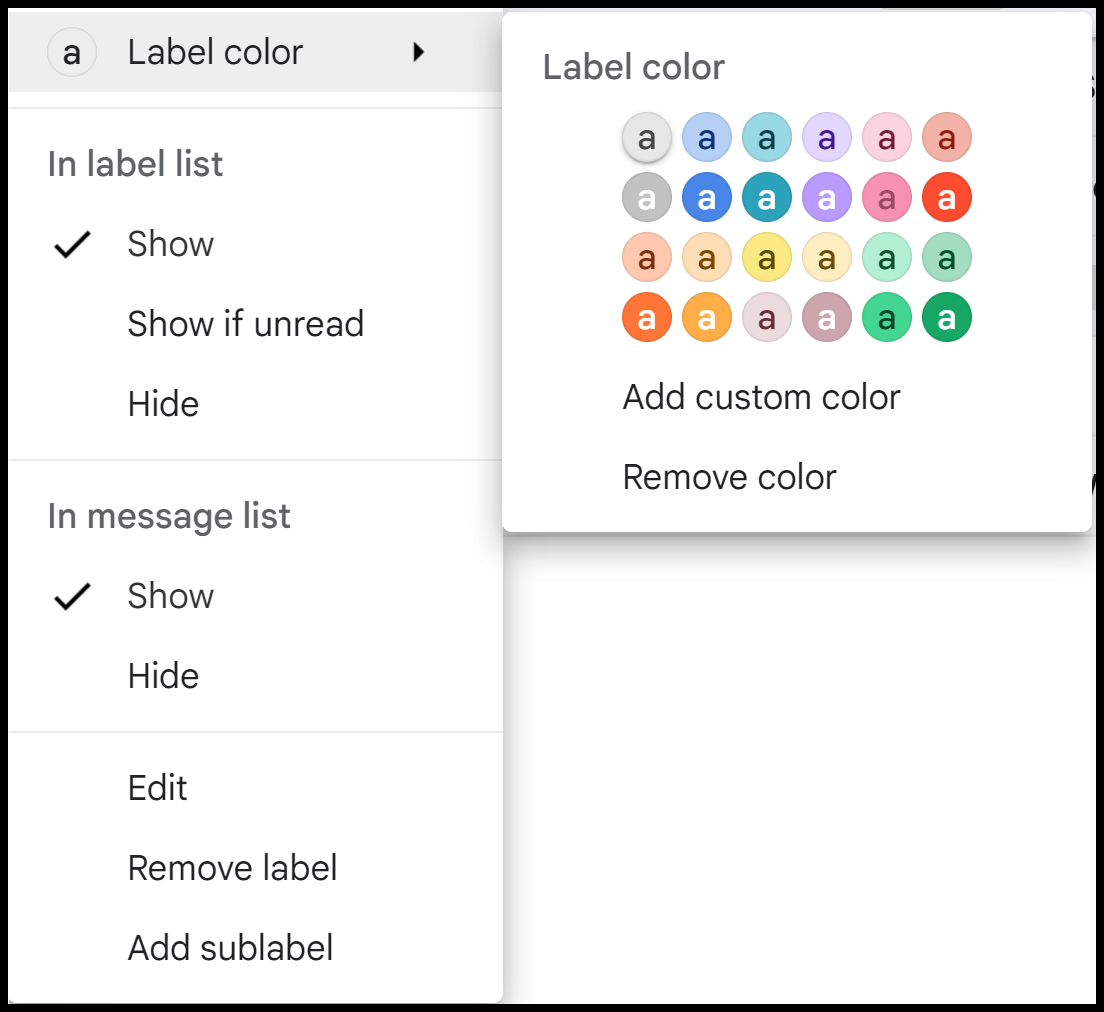
- Use the ARROW Keys, which work in all directions within the grid, to find a color you want to apply. Note that focus wraps at the end of one row to the beginning of the next row when moving to the right, and vice versa. So, for example, to choose a label with a dark blue background (which is found in row 2, column 2) you can press RIGHT ARROW one time to move to the second item in row one, which has a light blue background with darker text (RGB 182, 207, 245), and then press DOWN ARROW to move to the second row and second column, which is the label color for a dark blue background with white text (RGB 72, 134, 231).
- Once you find a color you want to apply press ENTER. The dialog box closes, and the color is applied to the label.
Note that if you apply a color to a primary label that also has a sublabel a dialog box opens that gives you a choice to apply the color to only the primary label or to the sublabel as well. I am just going to press ENTER to apply this to the main Tech-VI label.
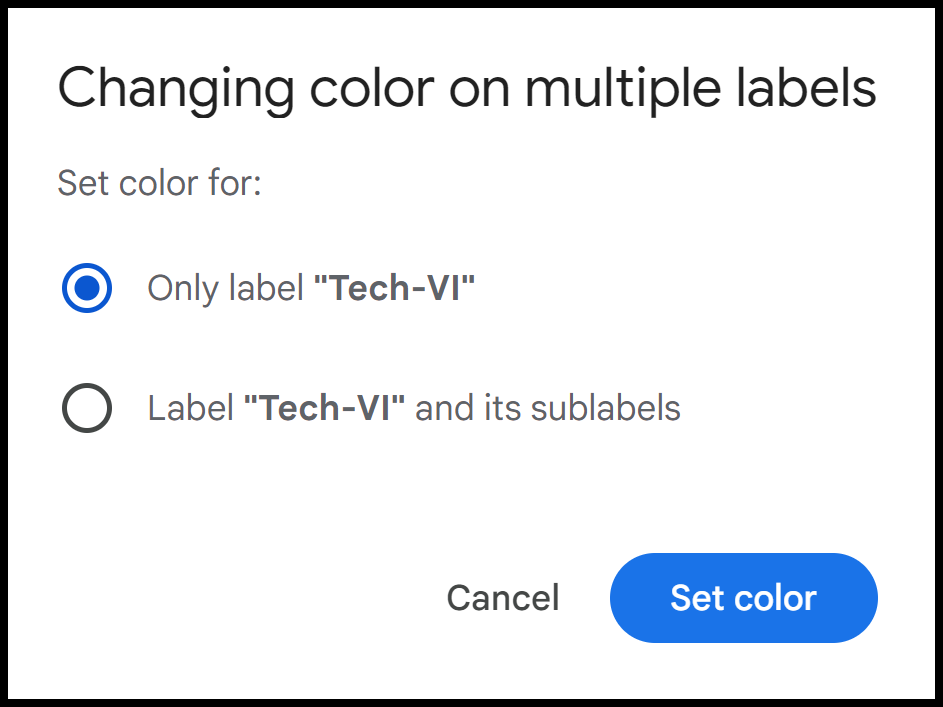
Now the background color of dark blue for the label “Tech-VI” has been added. All email conversations with this label now show a dark blue background with white text in the foreground.
Feel free now to pause the lesson so you can add more colors to the labels and/or sublabels you have created. I will add the following colors to the labels I have created. Use the table provided with the lesson to find the RGB values for the colors you choose:
- Follow up, dark purple, row 2, column 4
- Reply To, bright red, row 2, column 6
- Tech-VI/Braille, dark teal, row 2, column 3
- Tech-VI/Victor Reader Stream, light teal, row 1, column 3
- Technology, dark green, row 4, column 6
- Training, light coral, row 1, column 6
- YouTube, dark orange, row 4, column 2
Removing or Deleting Labels
This button opens the
It opens in a new window and allows you to play/pause the video in a different window while reading the instructions on this page.
Labels can be removed from email conversations, or they can be deleted entirely. If you remove all individual labels (including the Inbox label) from an email, you can normally still find the conversation archived in the All Mail label. Removing labels from a conversation does not delete the conversation.
Remove a Label From All Emails
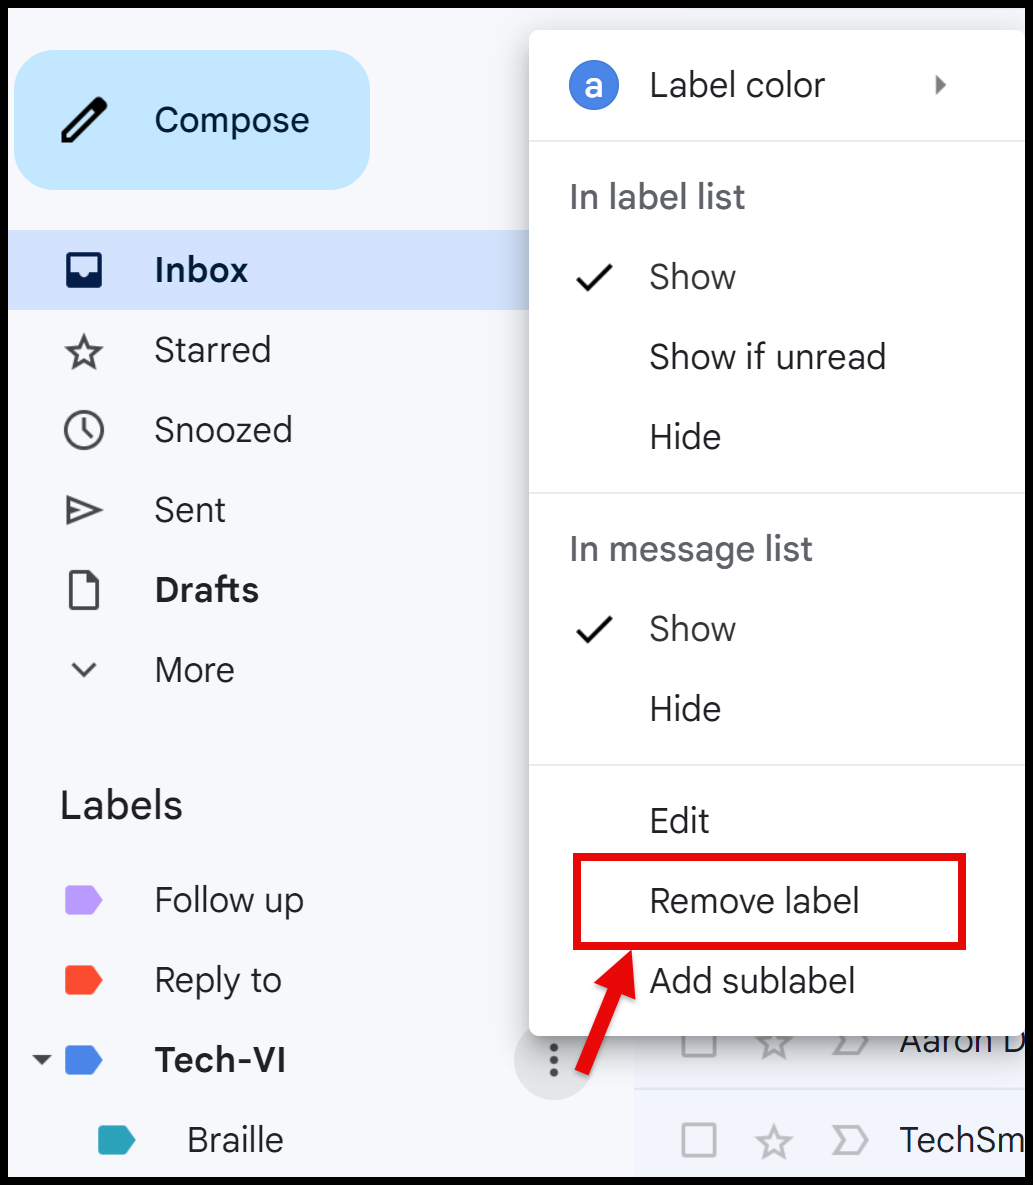
To remove a label from all emails that are associated with the label you can open the hamburger menu button to the right of any custom label in the navigation panel and choose “Remove label.” This deletes the label, but not the associated conversations.
I will remove the label I created earlier, “Testing.”
- Focus is in the Inbox. I will press the COMMA.
- Then SHIFT+TAB.
- And DOWN ARROW.
- And press the TAB key to move to the hamburger menu.
- And press ENTER.
- And finally, UP ARROW to Remove Label, and then press ENTER.
- And I will press the ENTER key.
Delete a Label From a Message In a List View
To delete a label from a message in a list view, do the following:
- With focus on a message in the list view press the letter X to select it, and then open the “Label as” button menu by pressing L.
- Move through the list by pressing DOWN ARROW to find the label you want to delete. It will read as “checked.”
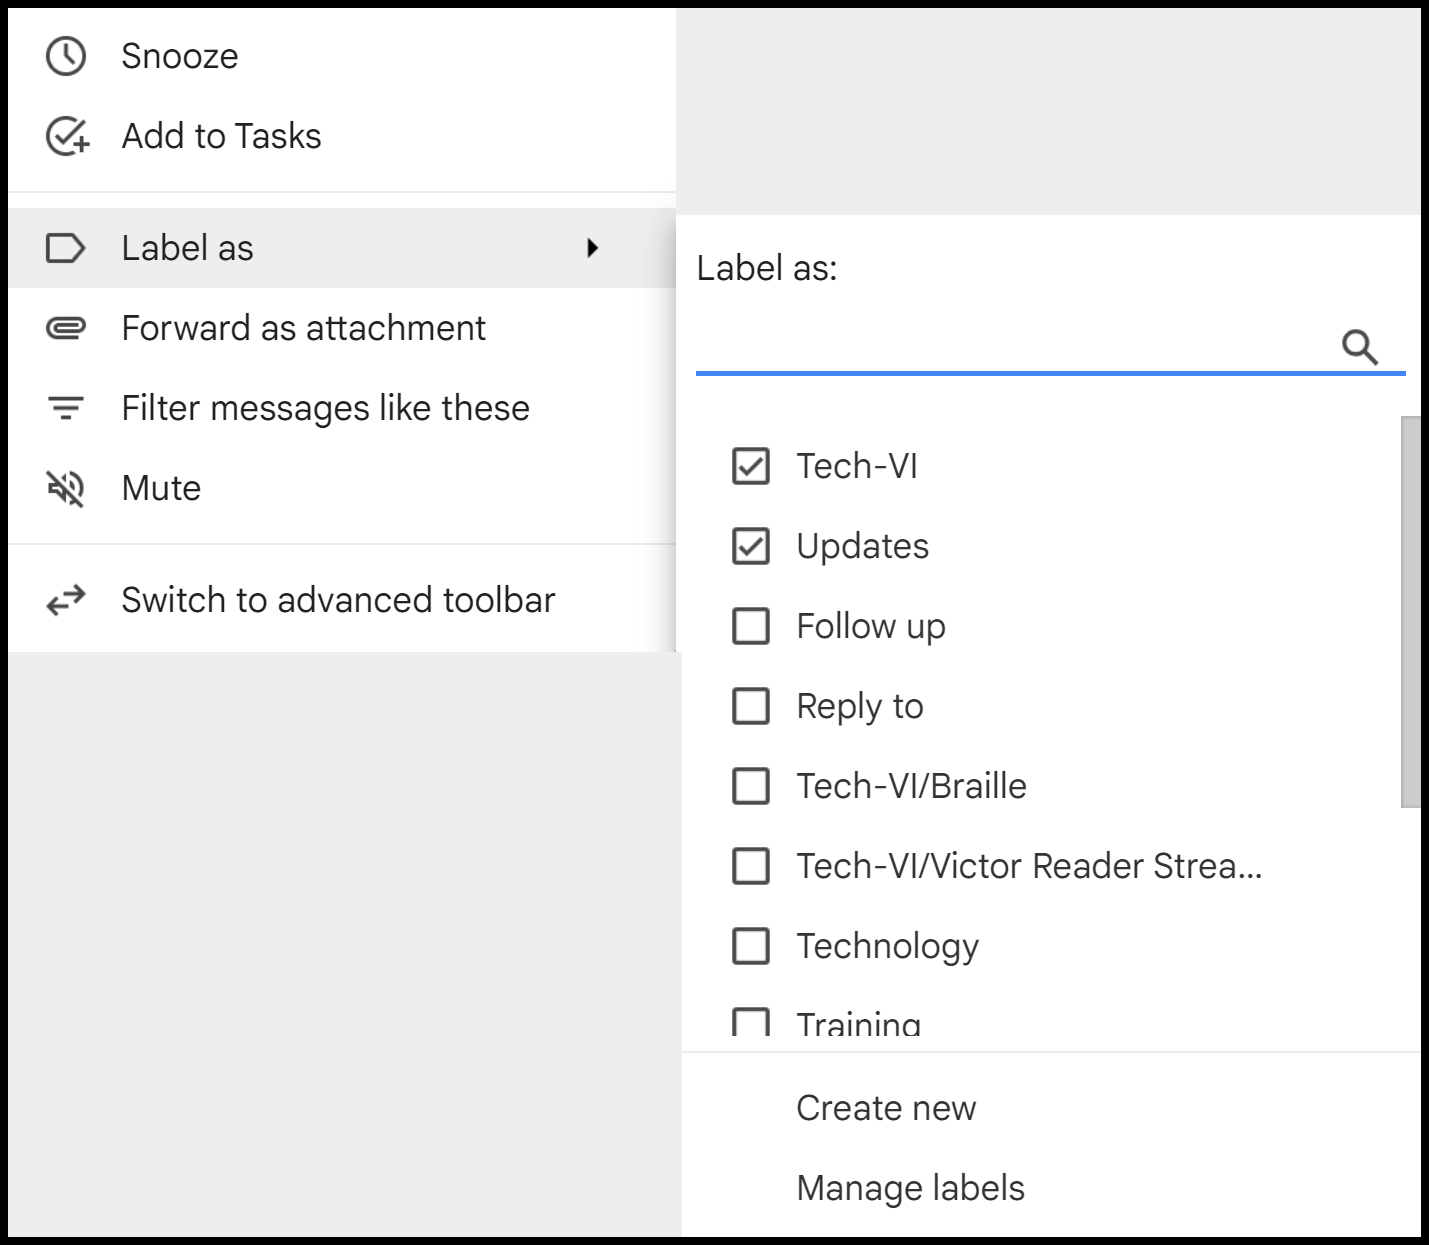
- Uncheck the label you want to delete by pressing ENTER. The conversation is removed from the label.
- Dismiss the Labels button by pressing ESC.
- Deselect the current item in the list by pressing the letter X unless you plan to perform other actions.
Delete a Label From Multiple Selected Messages in a List View
- First select multiple email conversations in a list view by using the letter X or left clicking the select check box to the left of each conversation with a mouse. I have several items already selected.
- Next, open the Label As button menu by pressing L.
- Move through the list by pressing DOWN ARROW to find the label you want to remove. It will read as “checked.”
- Uncheck the label you want to remove by pressing ENTER. The selected conversations are all instantly removed from the label.
- Dismiss the Labels button by pressing ESC.
- Finally, deselect the current items in the list by pressing the letter X for each unless you plan to perform other actions.
Delete a Label From an Open Email
To delete a label from an open email, do the following:
- After the email opens move to the first item, which should show the conversation’s importance, by pressing the TAB key.
- Press the TAB key to move to the next item, which should be the name of the first label.
Note that you can also search for all messages with this label by activating the label button from an open message with that label.
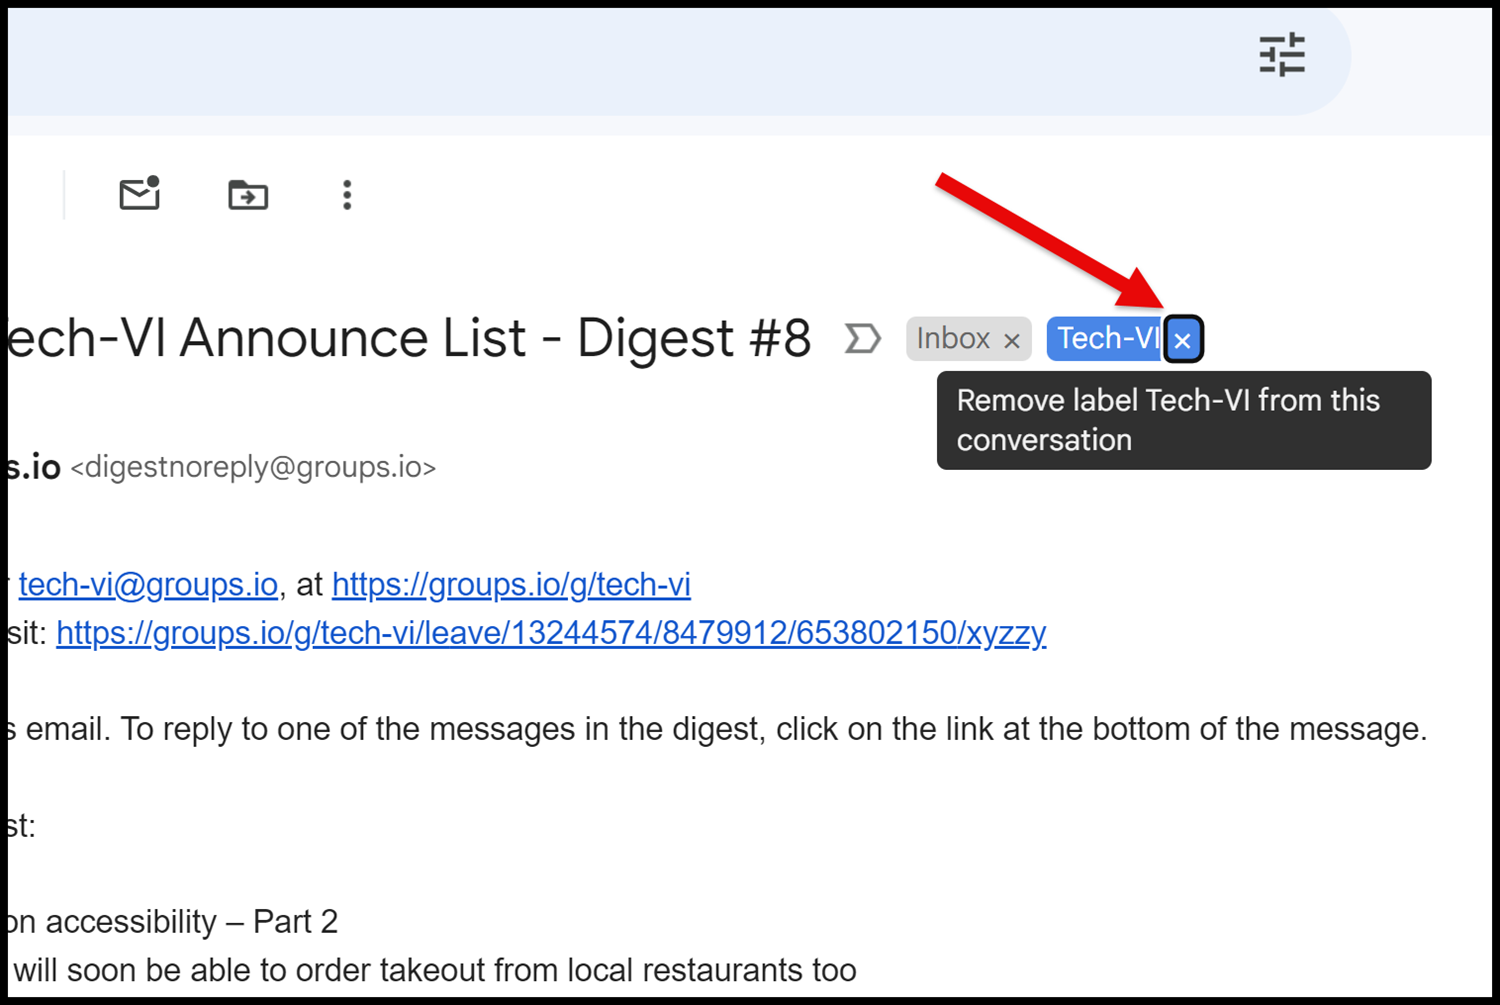
- Press the TAB key once more to the “Remove label from this conversation” button. If this is the label you want to remove, press ENTER. The label is removed from the conversation. In this message, the Inbox label is the first one. I do not want to remove this message from the Inbox currently.
- If the first label you find is not the one you want to remove, continue to press TAB to find it and use its remove label button to remove it from the conversation.
Search and Create Filters with Gmail Labels
This button opens the
It opens in a new window and allows you to play/pause the video in a different window while reading the instructions on this page.
NOTE: You can move focus to the search edit box in Gmail by pressing the FORWARD SLASH key (/).
There are several ways to use labels in Gmail search. You can:
- Find all email conversations with a given label.
- Find messages within a specific Gmail label that contain certain keywords or phrases.
- Use Advanced Search Options for even more detailed results with labels.
Search all Messages with a Certain Label
To search for all messages that have a given label do the following:
- Open the Go to Label list by pressing G L. Focus moves to the Search edit box where the word “label:” is entered automatically for you. You can press DOWN ARROW from the Search edit box to go through a list of System labels such as Inbox, Starred, Snoozed, Important, Sent Mail, and Scheduled. Pressing ENTER on any of the System labels in the list closes the Search and displays the conversations in that that label.

I will choose the Starred label and press ENTER. Try any of the other system labels to view the results and then continue the lesson.
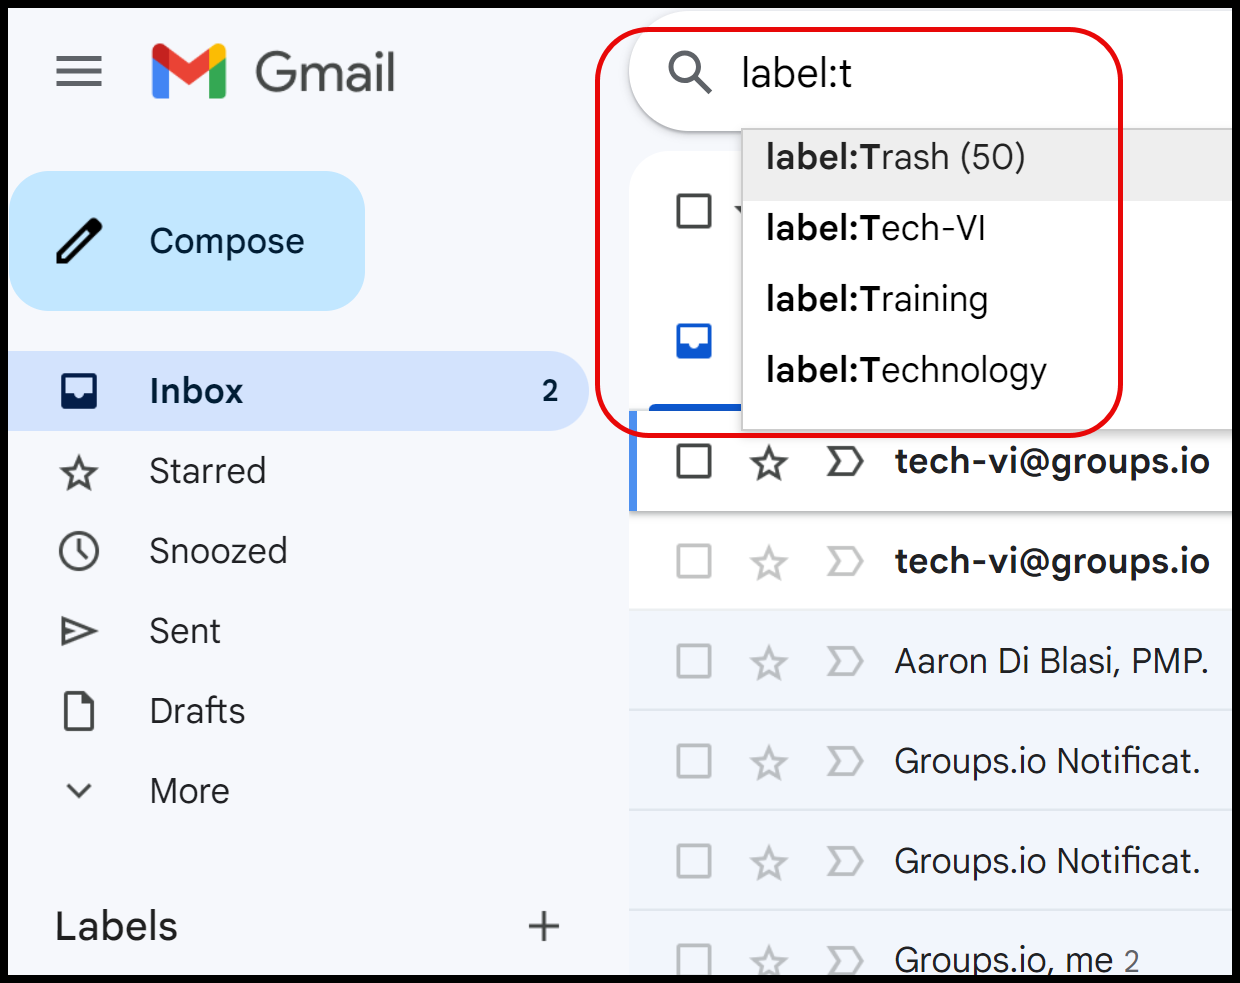
- After opening the Go to Label list with G L you may search for custom labels you have created. I will press G L.
Begin typing the first letter of any custom label. As you type, a list box appears below the search field with any matching results. For example, if you have several custom labels that all begin with the letter “T” (For example: Tech-VI, Technology, and Training) they will appear in the list.
Move to the label you want to choose, and press ENTER. The search edit box closes and the list now shows conversations that are marked with that label.
Search for Words or Phrases Within a Label
You can also search for additional keywords or phrases within a given label.
- Focus is in the Inbox. Open the Go to Label list by pressing G L. Focus moves to the Search edit box where the word “label:” is entered automatically for you. Focus is at the end of the word after the colon.
- If you are looking for one of the System labels just press DOWN ARROW. If you are looking for one of the labels you have created, first begin typing so you can find the label in the search results list. I want to use the Tech-VI label, so I will press the letter T.
- And then press DOWN ARROW several times.
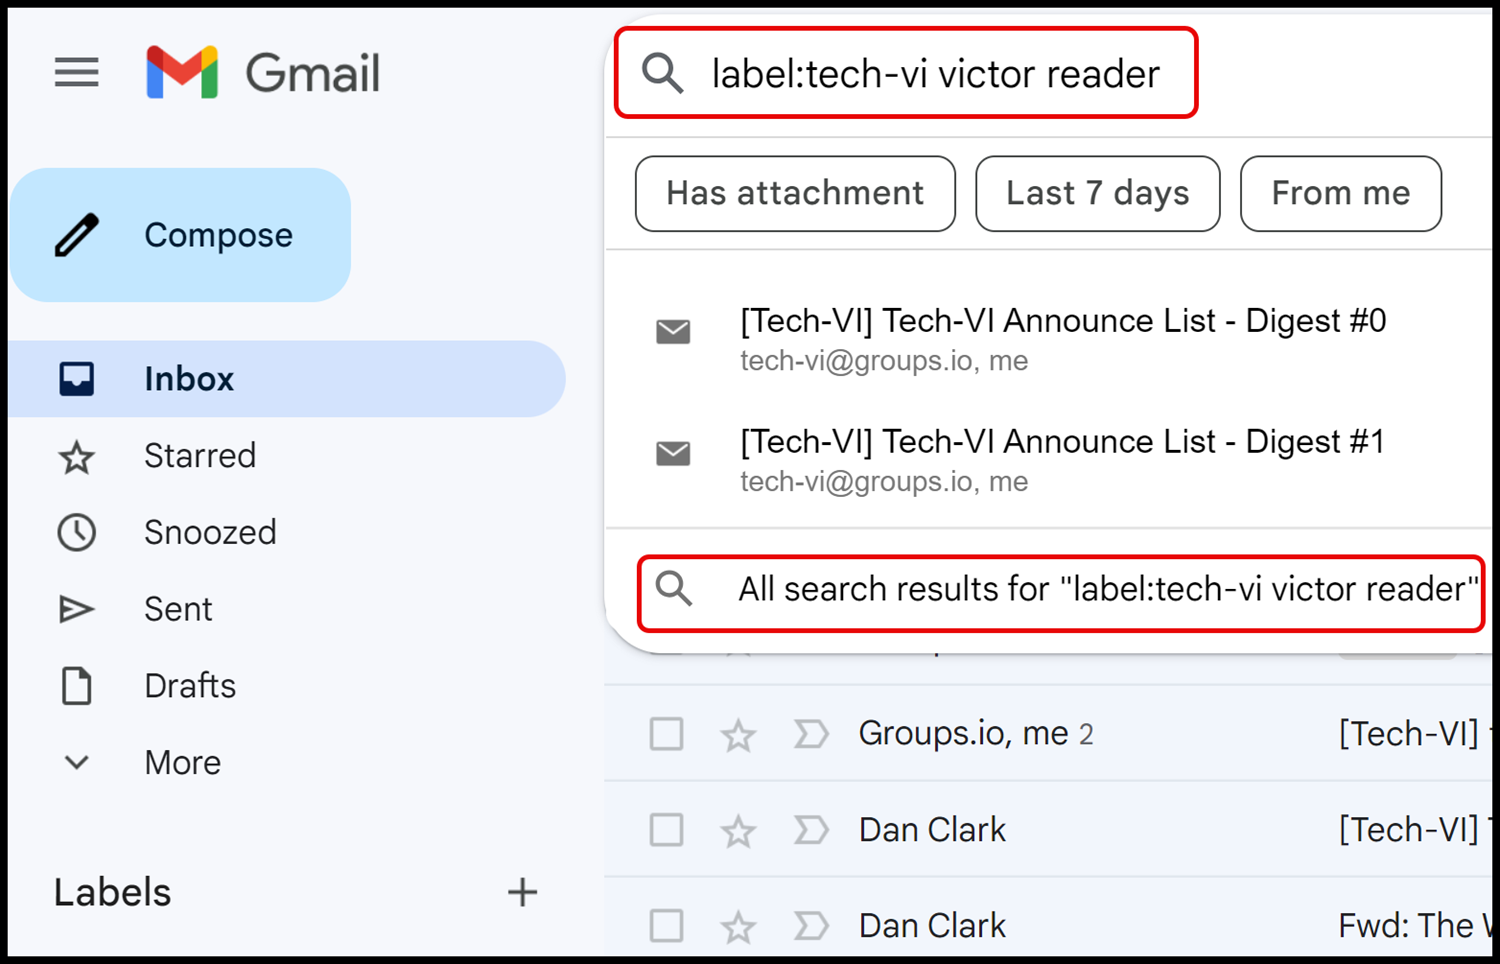
- Once you find the label you want, press the TAB key. The list closes and focus returns to the Search edit box with the search phrase “label:MyLabel,” where “MyLabel” represents the label you chose. In my case, label:tech-vi.
- Type in a word or phrase to search for within the label. I will type the phrase “victor reader” enclosed in quotation marks, since I am looking for those two words together, not as two separate search words. As I type, Gmail narrows the search criteria to match.
- Press DOWN ARROW to move to the results list.
When searching for labels that have spaces in their names Gmail uses a dash (-) for spaces. For example, a label named “Reply To” with a space between the two words looks like the following in the search format:
label:Reply-To
- For now, I will press ESC to get out of the Search results.
Clear Search Results in Gmail
NOTE: Search queries are persistent for the current session. If you wish to clear the search history during the current session do the following:
- After pressing ESC to return to the Search edit box move to the “Clear search” button by pressing TAB twice, and then activate it with the SPACEBAR.
- Then press ESC twice more to return to the Inbox or other current message list.
Using the Advanced Search Options with Labels
The Advanced Search Options button is just to the right of the Search edit box near the top of the page in Gmail. It gives you much more flexibility in search criteria. The easiest way to open it is by pressing the FORWARD SLASH key to move to the Search edit box followed by pressing the TAB key once.
Create a Filter to Move Messages Out of the Inbox and Add a Label
You can create a filter to help organize your Inbox by moving messages from a group, person, or with certain words or phrases and add them to a label for later reading and follow up. In this example you will create a filter for emails from a group that automatically moves them out of the Inbox and into a different label, adding the label to all conversations that match the search criteria.
- From the Inbox, open a message that has the criteria you want to include in the filter. I will move to one that is not already marked by pressing UP ARROW, and then press ENTER to open it.
- Move to the More button on the toolbar by pressing the PERIOD key.
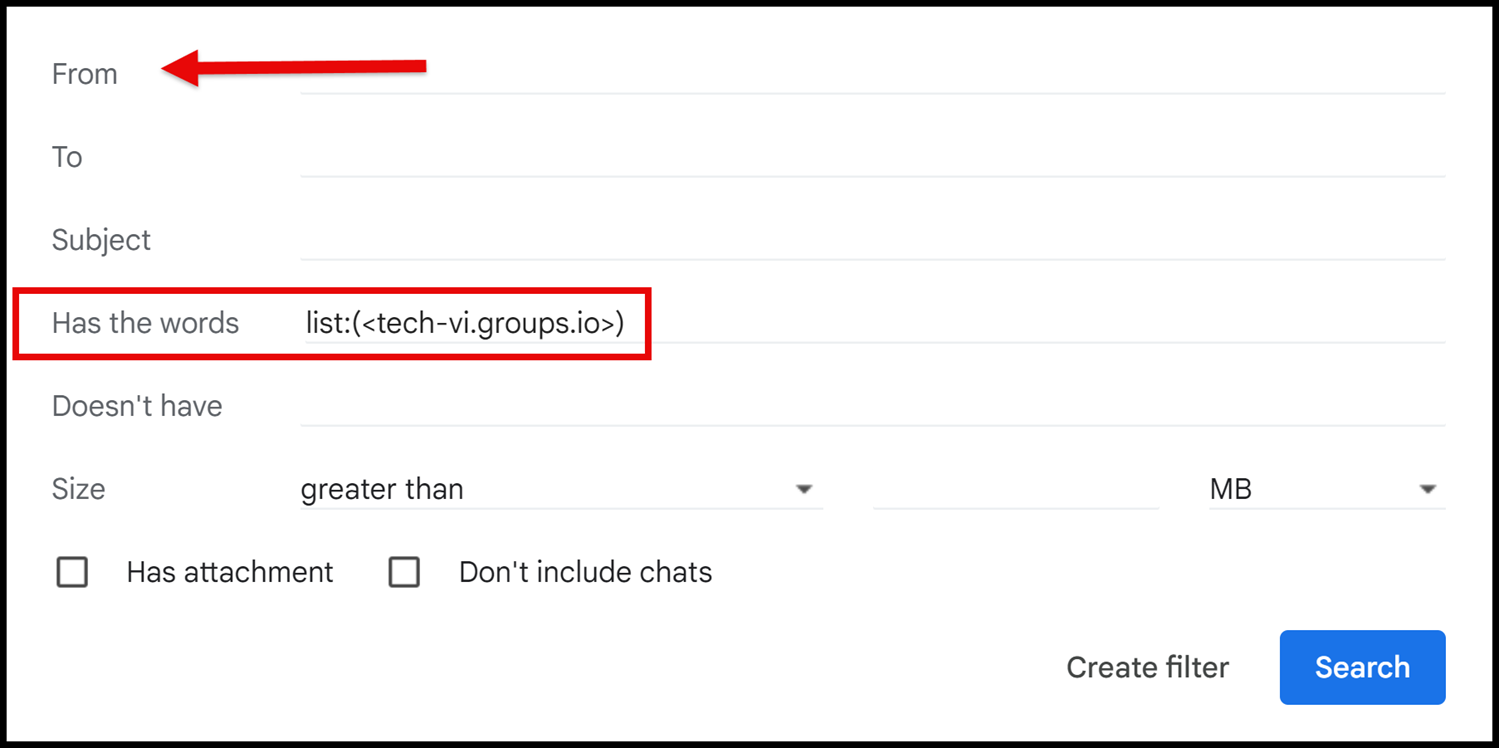
- Choose “Filter messages like these” in the menu, and then press ENTER. The Search Mail dialog box opens. If focus is not in the From field, the first field in the dialog box, take a moment and press TAB several times to move there, and then continue with the lesson.
- Move to the “Create filter” link by pressing TAB several more times, and then press ENTER to activate it. Gmail has chosen the words “tech-vi.groups.io” as the search criteria.
- If you wish to add other search criteria you can do so while going through this dialog box. I will leave it as it is and press TAB.
- I will press ENTER. A new dialog box with several check boxes opens. It reads, “When a message is an exact match for your search criteria.”
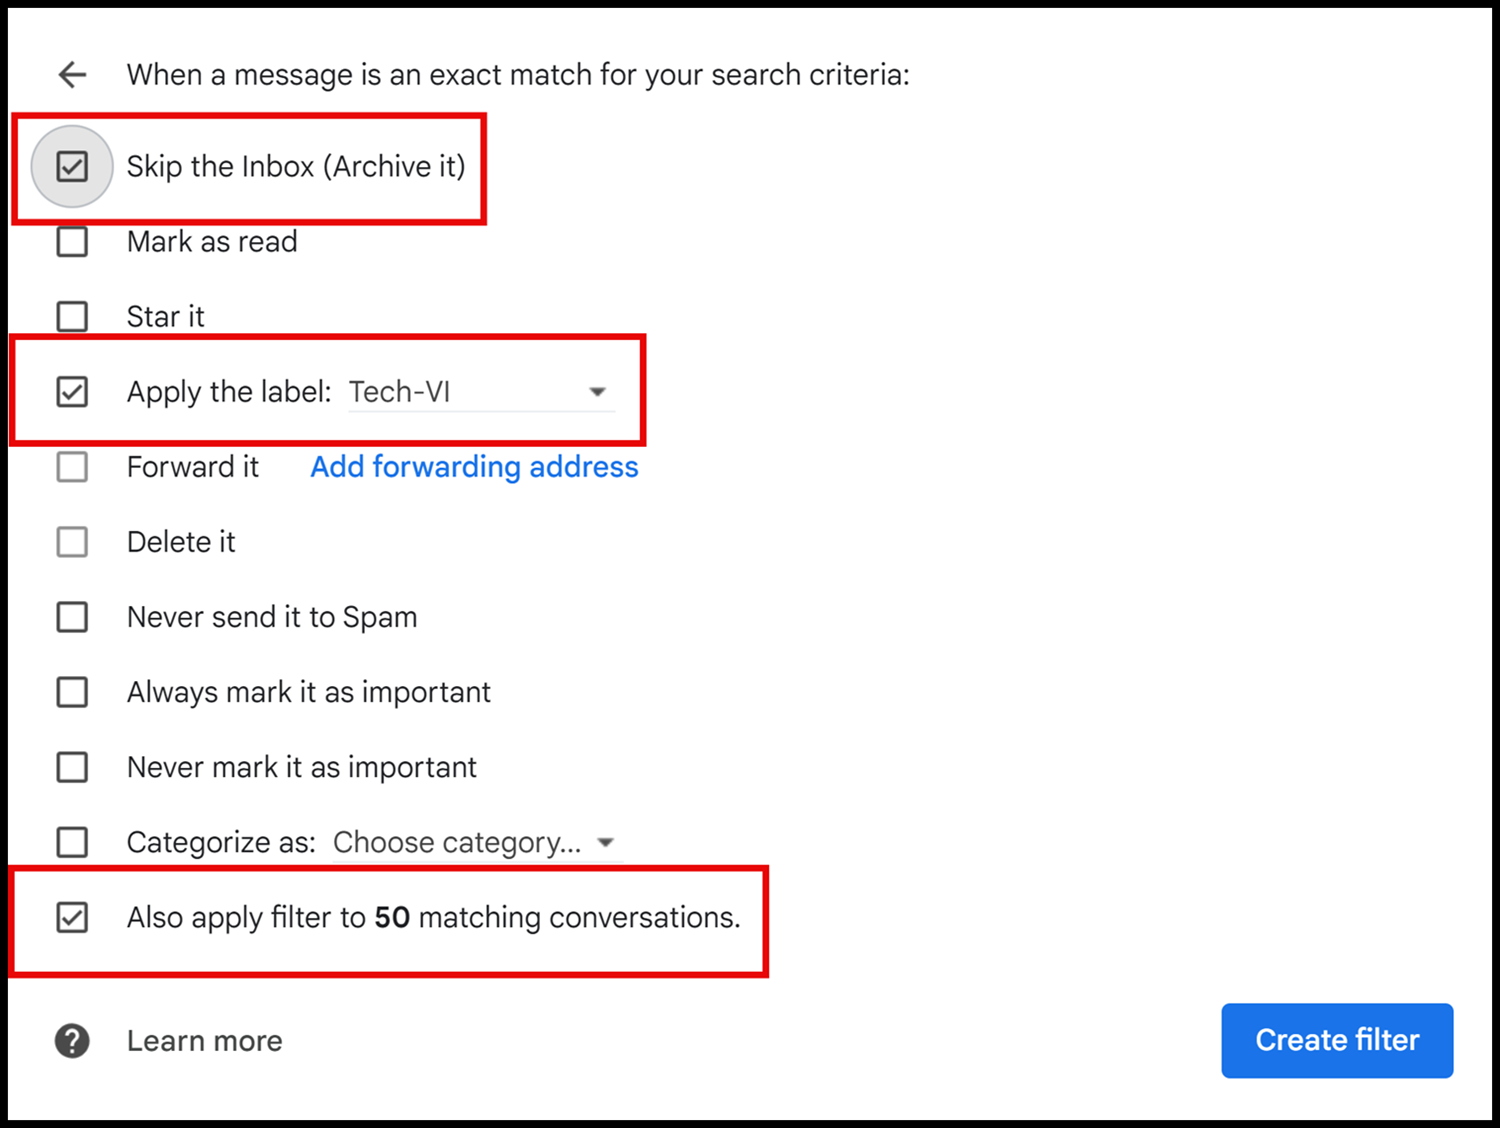
- To automatically move new items from the Inbox to the label instead of having them appear in the Inbox, press the TAB key to move to the first check box, “Skip the Inbox (Archive It),” and then press the SPACEBAR to check it.
- Explore the other items available by pressing the TAB key. You can choose things such as mark as read, star it, forward it, and more. I am going to move to the check box for “Apply the label,” and then press SPACEBAR to select it.
- Move to the “Choose label” combo box by pressing TAB.
- Choose Tech-VI in the list, and then press ENTER. Focus remains in the combo box.
- Continue through the remaining check boxes by pressing TAB.
- If you have other email conversations in the current Inbox or other label that match these criteria you can check the box that reads, “Also apply filter to X matching messages,” where the letter X represents the number of matching messages. I will do that now. So, I have 50 matching conversations in my Inbox currently. I will check this, so I do not have to manually mark them with the label.
- When you are finished, move to the “Create filter” button, and then activate it by pressing ENTER. Focus returns to the Search edit box.
- Press ESC to remove focus from the search edit box.
- Finally, press G I to go back to my Inbox.
- Focus returned to the open email so I will press ALT+LEFT ARROW to go back to the Inbox.
Now, my Inbox has been really decluttered. The Tech-VI emails have all been placed into the Tech-VI label. Future messages that meet the criteria for this filter will automatically go there as well.
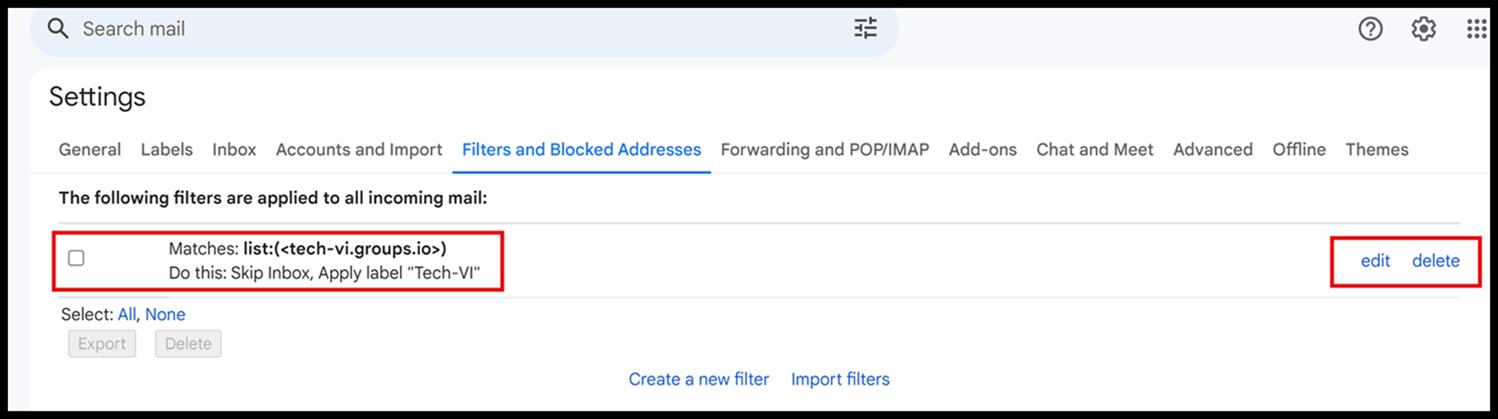
Delete a Filter
Filters you create can be found In the Gmail See All Settings screen on the “Filters and Blocked Addresses” tab page.
Find the filter to the right of a check box as well as an edit link and a delete link for each.
Thank you for joining me in this lesson on Gmail labels using the keyboard!